
Have you ever wondered how a simple SQL command unlocks database power? SQL, or Structured Query Language, is the backbone of modern data management. It allows efficient retrieval, manipulation, and management of information in relational databases.
Behind every query we run, there’s a complex sequence of processes. These transform our commands into actions performed by the database management system (DBMS). Mastering these processes lets us harness their full potential.
As developers, it’s crucial to understand the journey of a SQL statement. This journey takes us through the SQL parser, query optimizer, execution engine, and underlying storage engine. With this insight, we can:
Enhance query performance by understanding how data is stored, indexed, and accessed.
Choose effective indexing strategies, informed by our understanding of the DBMS architecture.
Improve resource management, from memory allocation to caching to query execution parallelism.
Diagnose and address performance bottlenecks effectively by identifying potential areas of contention, resource constraints, or inefficiencies within the system.
Join us as we explore MySQL. We will use it to demonstrate database architectures and how queries are processed.
SQL standards are developed and maintained by international standards organizations, such as the International Organization for Standardization (ISO) and the American National Standards Institute (ANSI). These standards are shaped with contributions from industry experts and database vendors. Their goal is to ensure interoperability, portability, and consistency across various SQL implementations. This enables developers to write SQL code that can run on multiple database platforms.
The diagram below presents a brief history of SQL standards.
There are 4 stages in SQL standard development. It began with the early versions – SQL-86, SQL-89, and SQL-92- – which formed the foundation and introduced major keywords. SQL:1999 is often recognized as a pivotal point in modern SQL development. However, later standards have continued to introduce valuable features and improvements. These address ongoing challenges in data management and adapt to technological advancements.
Each SQL standard builds on the work of its predecessors, contributing to the ongoing evolution and refinement of the language.
A SQL statement is a command interpreted and executed by the SQL engine. It is primarily considered a declarative language, focusing on specifying what data should be retrieved or manipulated rather than how to retrieve it.
SQL abstracts the implementation details of data retrieval and manipulation. Developers use SQL's high-level syntax to express their data requirements without worrying about low-level details such as disk I/O operations, data access paths, or index usage.
The portability of SQL across different database platforms is one of its key advantages. SQL queries written for one system often require minimal or no modifications to run on another, as long as they adhere to the SQL standards.
Consider the following example of SQL syntax. The SELECT statement retrieves specific data from one or more tables. It’s paired with the FROM clause, which specifies the tables involved in the query.
To incorporate data from multiple tables, the JOIN clause establishes relationships between them based on shared keys or conditions. The WHERE clause allows for the filtering of rows based on specified conditions, further refining the result set.
For aggregating data based on common attributes, the GROUP BY clause is employed. This facilitates summary statistics or grouping operations. Finally, the ORDER BY clause sorts the query results in a specified order based on columns.

Let’s explore the lifecycle of a SQL statement in a relational database, using MySQL as an example.
Broadly speaking, MySQL is structured into two main tiers: the Server tier and the Storage Engine tier.
Server Tier: This tier includes connectors, query caches, analyzers, optimizers, and executors. It covers most of the core service functions of MySQL, including all built-in functions such as date, time, mathematical, and cryptographic functions. All cross-storage-engine functionalities, like stored procedures, triggers, and views, are implemented at this layer.
Storage Engine Tier: This layer is responsible for data storage and retrieval. Its pluggable architecture allows for the use of various storage engines, such as InnoDB, MyISAM, and Memory. InnoDB is the most popular and has been the default storage engine since MySQL version 5.5.5.
When executing a “create table” command, MySQL defaults to using InnoDB. However, users can specify another engine by including options like engine=memory for an in-memory engine or other supported engines according to their needs. Each storage engine offers different methods of accessing table data and supports different features.
The diagram below illustrates the high-level architecture of MySQL. Let's walk through it step by step.

Connecting to a database begins with the connection pool, accessed through various client connectors. The connection pool's primary responsibilities include establishing a connection with the client, granting permissions, and managing the connection. Following a standard TCP handshake, the connection pool proceeds to authenticate the user using the provided username and password.
Once authenticated, the connection pool checks the permissions table to grant the appropriate permissions to the connection. It's important to note that once a connection is established, any changes made to the user’s permissions will not affect the permissions of that existing connection.
If no further actions occur after the connection is established, it enters an idle state. Should the client remain idle for too long, the connection pool will automatically sever the connection. The client must then reconnect to initiate any new requests to the database.
Once the connection is established, we can execute SQL statements. When the MySQL server receives a query, it initially checks the query cache to determine if the statement has been executed previously. Executed statements and their results may be cached directly in memory as key-value pairs, where the query statement serves as the key and the query result as the value.
If the query can be matched directly in this cache, the result is immediately returned to the client.
If the statement is not found in the query cache, the query execution proceeds as normal. Upon completion, the result is then stored in the query cache for potential future use.
While using the query cache can seem quite efficient, it is generally not recommended for tables that change tables frequently. Such changes invalidate the query cache too often, reducing its effectiveness. Note that MySQL has removed the query cache starting from version 8.0 due to these limitations.
If the query is not in the query cache, the request moves to the command parser. Here, the parser performs a lexical analysis to classify each string in the SQL statement. For example, it identifies keywords such as “SELECT” or “UPDATE”. Then, it performs a syntax analysis to determine if the statement complies with MySQL’s syntax rules. This ensures that the arrangement of these elements forms a valid SQL command.
After parsing the SQL statement, the server knows what it needs to do next. But before executing the statement, it consults the optimizer.
The optimizer determines the most efficient way to access data. When a table has multiple indexes, the optimizer chooses which one to use. It also decides the sequence for joining tables when a statement includes multiple joins.
Consider this scenario where we execute a join statement between users and orders tables:
SELECT *
FROM users a
JOIN orders b
ON a.ID = b.ID
WHERE a.AGE = 30 AND b.PRODUCT_ID = 201;
Here, we have two options: filter by AGE = 30 on the users table or by PRODUCT_ID = 201 on the orders table. Although both approaches yield the same results, their efficiency may be different. It is the optimizer’s job to select the best execution plan based on the indexes and statistics available for the tables.
After selecting the best plan, the optimizer sends it to the executor.
The executor begins by verifying whether we have the necessary permissions to execute the statement on the tables. Once permission is confirmed, it uses the interfaces provided by the storage engine to access the data.
Let's look at the execution process using our previous example, assuming there are no indexes on the tables and a table scan is required:
Fetch the first row from the users table using InnoDB interfaces. If the AGE column is not 30, discard the row and proceed to the next.
Continue this process to collect all rows where AGE = 30 until reaching the end of the table.
The executor then sends the result set back to the client.
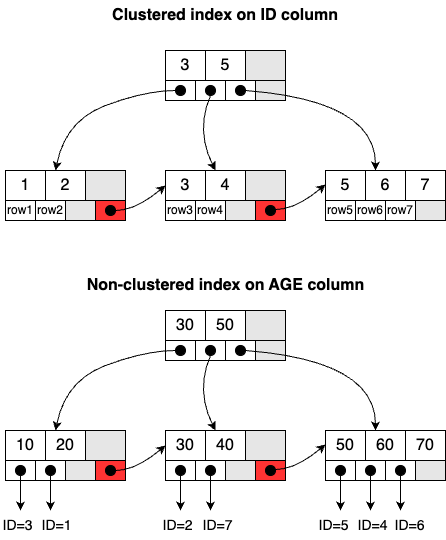
If the tables have predefined indexes, the executor first checks these before scanning the entire table. Essentially, each index is associated with a B+ tree structure in the InnoDB storage engine. For example, consider that we’ve created two indexes on the users table: one for the ID column, and the other for the AGE column. These indexes help the executor quickly locate the relevant rows by navigating through the B+ tree structures instead of examining every single row in the table.
Indexes are categorized based on the data stored in the leaf node: a clustered index and a non-clustered index. The index on the ID column is a clustered index, where the entire row of data is stored in the leaf node. This is also called the primary key. The index on the AGE column is a non-clustered index, storing only the primary key value in the leaf node. This is also called the secondary index.
Next, we will discuss how an update statement is executed in the DBMS.
An update statement does more than a select statement, which simply retrieves data based on certain conditions. It actively modifies persisted data, adding layers of complexity to the process.
Just like the select statement, an update statement passes through several stages: the connection pool, analyzer, optimizer, and executor. However, it also involves two important logging modules to guarantee data consistency: the redo log and the binlog. Let's explore each of these modules.
First, let's explore the Write-Ahead Log (WAL) architecture, an essential concept in database management.
In a WAL system, changes to the database, such as inserts, updates, and deletes, are first recorded sequentially in a log file before they modify the actual database. This process ensures that if a crash occurs before the changes are applied to the database, the system can recover by replaying these log entries. This mechanism brings the database back to a consistent state by restoring the information recorded in the log.
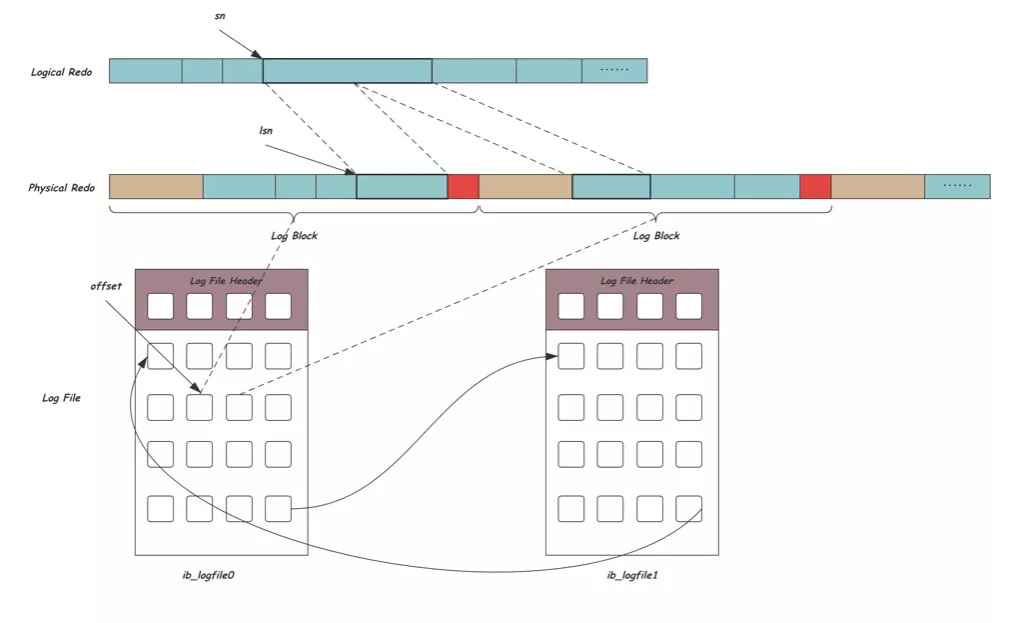
The redo Log in MySQL employs the WAL principle. It ensures that all transactions are durable and the database remains consistent, even after a crash. The diagram below shows the three layers in the redo log architecture:
Logical redo layer: This layer contains multiple records linked together, each identified by a sequential offset number (sn).
Physical redo layer: Since the disk operates as a block device, this layer utilizes the concept of blocks to read and write data. A single block may contain multiple redo logs, or a redo log might be spread across several blocks.
File layer: Redo logs are stored in specific log files (like ib_logfile0, ib_logfile1, etc.). To minimize the overhead associated with file creation and space allocation, InnoDB recycles its REDO files.
This architecture ensures that InnoDB is crash-safe. It can recover all committed transactions even after a database crash.
Next, we'll examine another crucial logging mechanism at the server layer: the binlog.
The binlog differs from the redo log in three key ways:
Scope of use: The redo log is specific to the InnoDB engine, whereas the binlog operates at the server layer and is accessible by all storage engines.
Type of logging: While the redo log captures physical changes made to the data pages,the binlog logs the SQL statements used to execute the transactions, recording them in a logical format.
Size management: The redo log has a fixed size and must be recycled regularly, but the binlog can keep appending data to it.
During an update operation, the executor first retrieves the relevant rows from memory or disk and modifies them in memory. This process is managed using a protocol known as Two-Phase Commit (2PC), crucial in distributed systems to ensure transaction consistency across multiple participants.
In the first phase, known as the prepare stage, changes are recorded in the redo log. Subsequently, these modifications are logged into the binlog during the second phase, the commit stage, where the transaction is finalized.
This approach ensures synchronization between the redo log and the binlog. It is critical for the consistency and durability of transactions.
Additionally, the InnoDB storage engine includes other crucial components like the lock manager and transaction manager. These components are vital for managing concurrency. For instance, in our update scenario, the rows being updated are locked exclusively to prevent other transactions from modifying them. We will explore database locks and their mechanisms in more detail in future issues.
In conclusion, executing SQL statements like SELECT and UPDATE in a DBMS is a complex, multi-step process. It involves parsing, optimization, execution, and transaction management.
While both SELECT and UPDATE statements follow similar execution paths, UPDATE statements require additional mechanisms such as the redo log and binlog. The redo log ensures the durability of transactional changes by recording them before they are applied to the database. In contrast, the binlog captures changes made by UPDATE statements, supporting both replication and recovery.
A thorough understanding of SQL statement execution, particularly the role of transaction logs, is essential for optimizing performance, ensuring data integrity, and maintaining the reliability of database operations.