In distributed systems, data is sent over the network using various network protocols. As an application developer, this often seems like a block box until an issue arises.
In this issue, we’ll explain how common network protocols work, where they are used in distributed systems, and how we troubleshoot common problems. We’ll cover some popular interview questions as well. For example:
What happens when we type a URL in a web browser?
What is the TCP 3-way handshake?
What is TCP time_wait?
What are HTTP 1/2/3?
Why does HTTP 3 use UDP?
How does HTTPS work?
Why is UDP considered “unreliable”?
Let’s first look at where the network protocols are used.
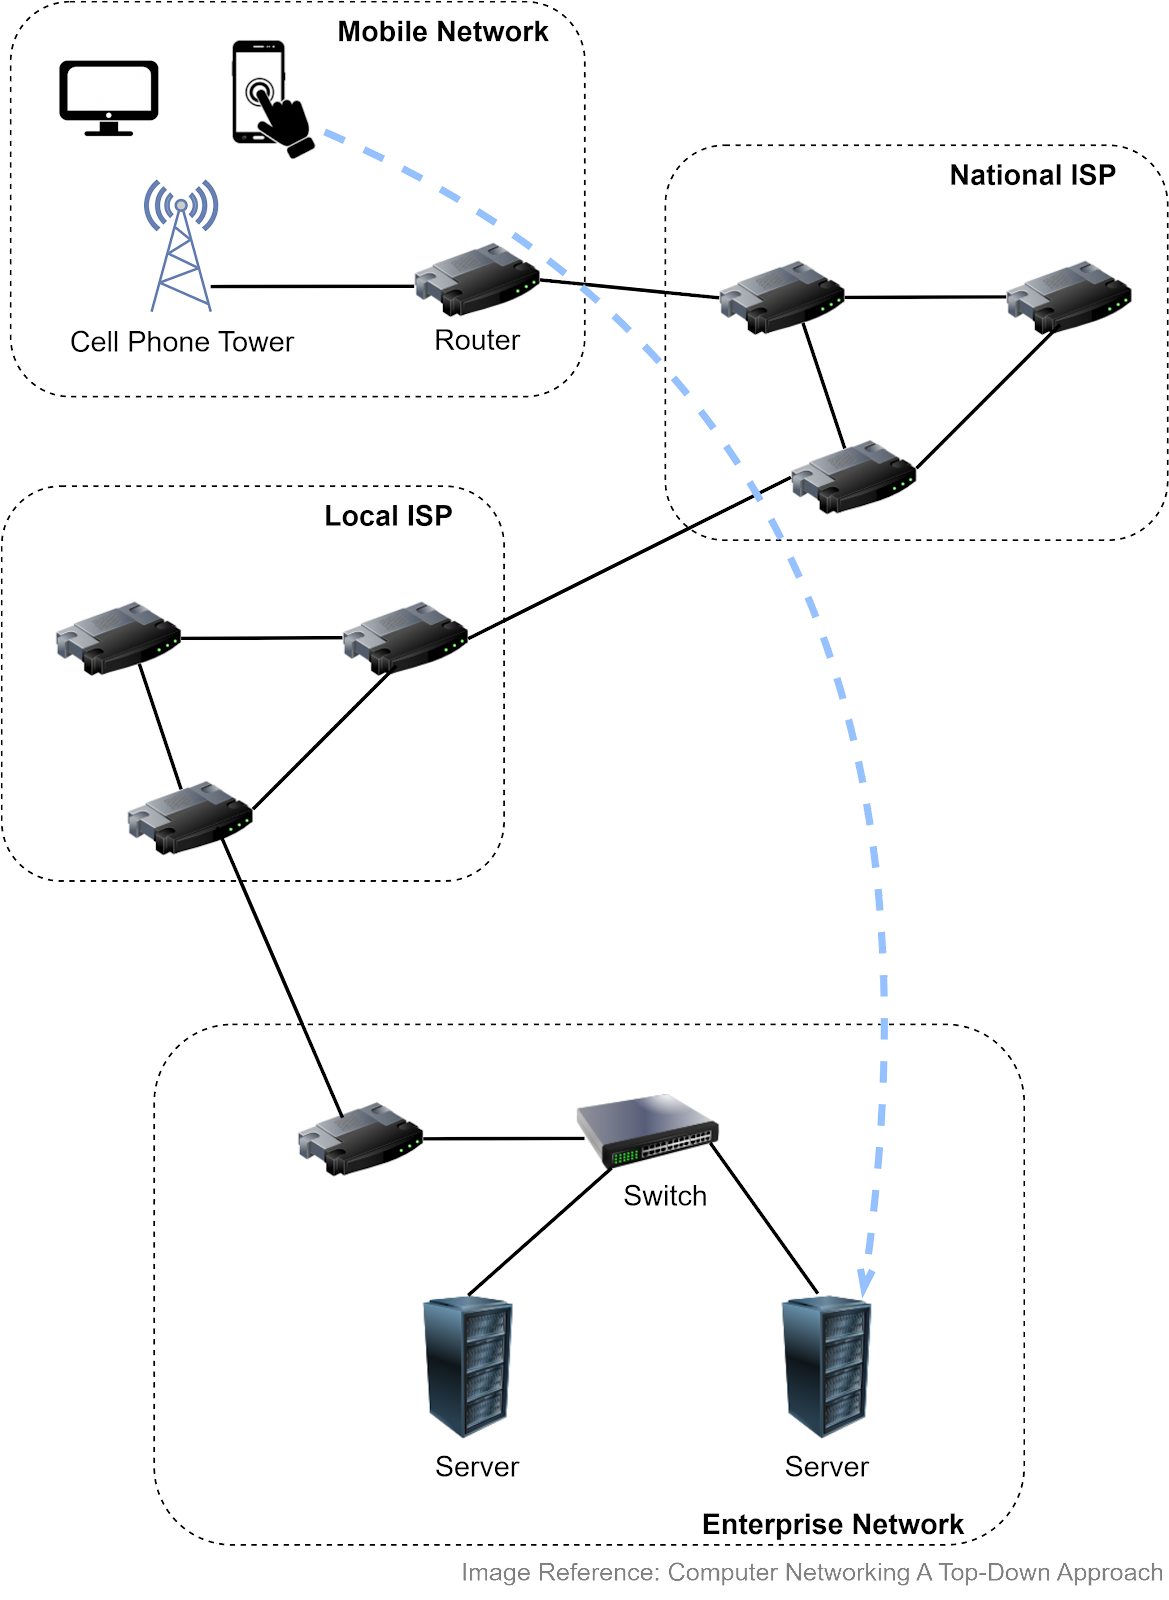
The Internet links a wide range of computing devices around the world. We can get a rough idea from the diagram below. Suppose we access a website from a smartphone or laptop, which connects to a cellular tower. The tower connects to a router, which then accesses the internet via Internet Service Providers (ISPs). Packets are forwarded to a local ISP, then to the network hosting the website. Once the packets reach the company network, they go through a link-layer switch and reach the appropriate server.
Both routers and link-layer switches are packet switches, and their job is to forward packets. The difference is that routers are usually used in the network core to connect multiple networks, while link-layer switches are used in access networks (the network that physically connects an end system to an edge router), connecting several devices in a single network.
Why do we need network protocols? Internet-connected devices need to communicate in a language that they can understand. Various computer systems communicate with each other using a standard specified by the OSI (Open Systems Interconnection) model. The OSI model has seven abstract layers, each with distinct responsibilities and protocols.
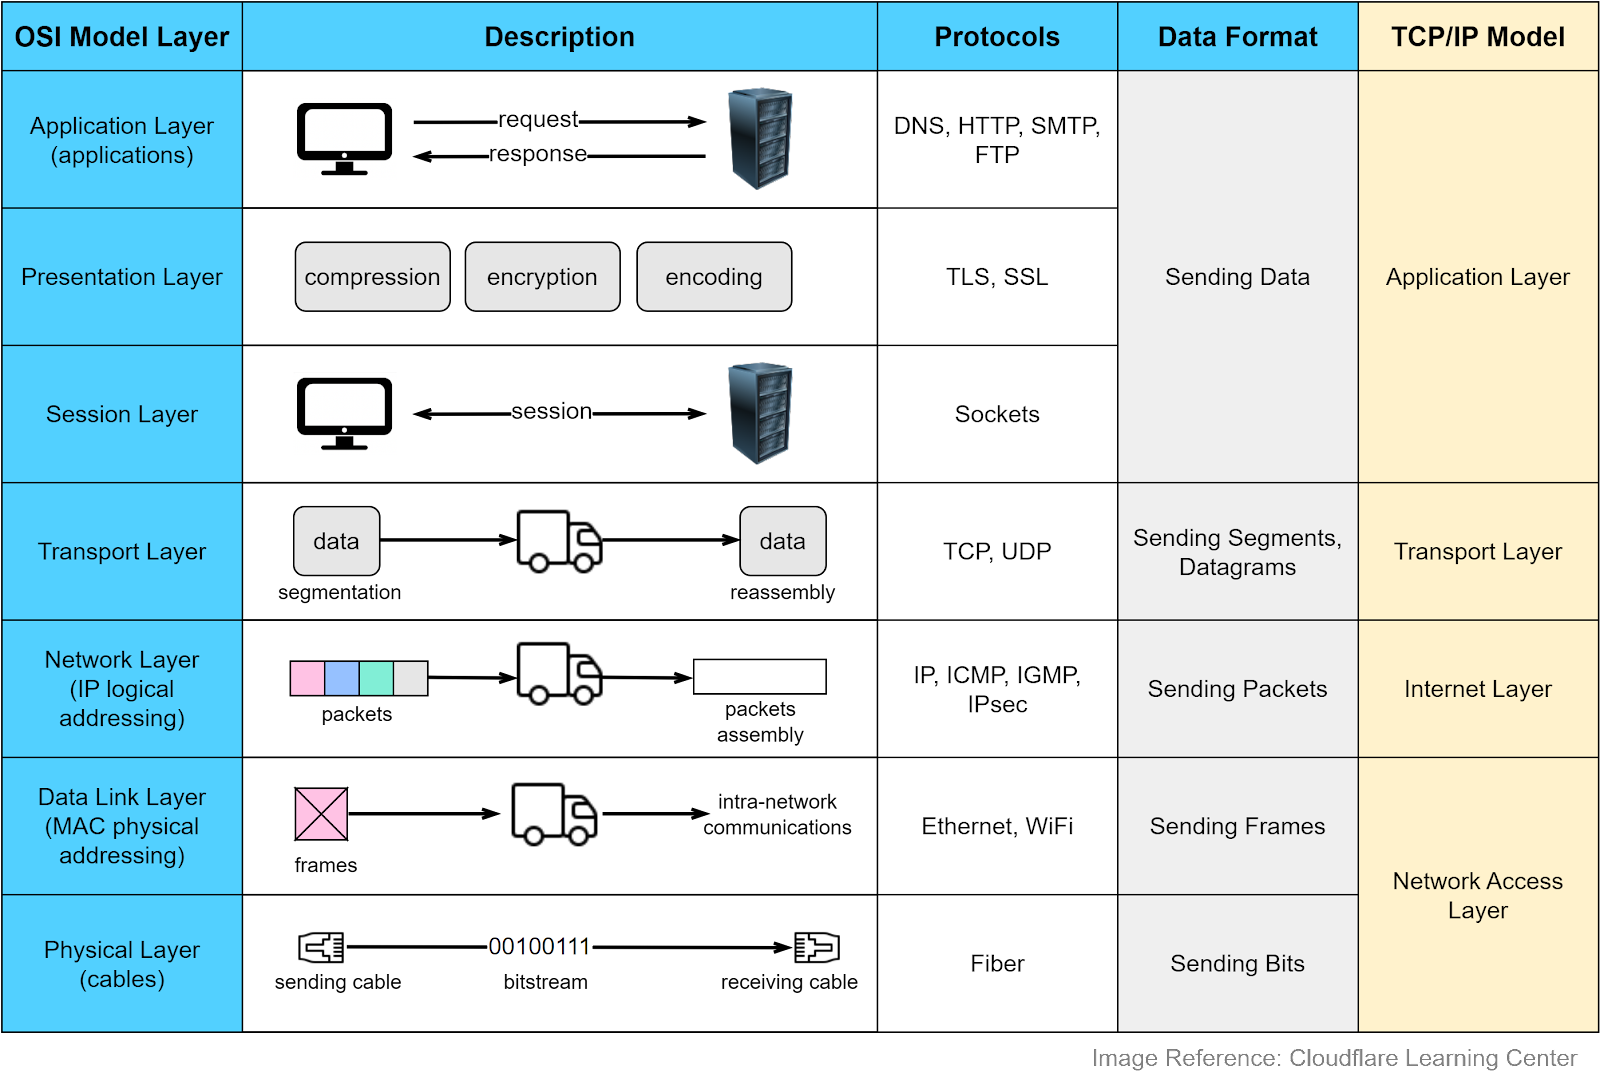
The diagram below shows what each layer does in the OSI model. Each intermediate layer serves a class of functionality to the layer above it and is served by the layer below it. Let’s review them.
Application Layer
The application layer is the closest to the end users. Most applications reside in this layer. We request data from a backend server without needing to understand data transmission specifics. Protocols in this layer include HTTP, SMTP, FTP, DNS, etc. We will cover them later.
Presentation Layer
This layer handles data encoding, encryption, and compression, preparing data for the application layer. For example, HTTPS leverages TLS (Transport Layer Security) for secure communications between clients and servers.
Session Layer
This layer opens and closes the communications between two devices. If the data size is large, the session layer sets a checkpoint to avoid resending from the beginning.
Transport Layer
This layer handles end-to-end communication between the two devices. It breaks data into segments at the sender’s side and reassembles them at the receiver’s. There is flow control in this layer to prevent congestion. Key protocols in this layer are TCP and UDP, which we’ll discuss later.
Network Layer
This layer enables data transfer between different networks. It further breaks down segments or datagrams into smaller packets and finds the optimal route to the final destination using IP addresses. This process is known as routing.
Data Link Layer
This layer allows data transfer between devices on the same network. Packets are broken down into frames, which are confined to a local area network.
Physical Layer
This layer sends bitstreams over cables and switches, making it closely associated with the physical connection between devices.
Compared to the OSI model, the TCP/IP model only has 4 layers. When discussing layers, it’s important to specify the context.
Now that we understand the responsibilities of each layer, let’s summarize the data transfer process using the following diagram. This is called encapsulation and decapsulation. Encapsulation involves adding headers to the data as it travels towards its destination. Decapsulation removes these headers to retrieve the original data.

Step 1: When Device A sends data to Device B over the network using HTTP, an HTTP header is initially added at the application layer.
Step 2: A TCP or a UDP header is added to the data. It is encapsulated into TCP segments at the transport layer. The header contains the source port, destination port, and sequence number.
Step 3: The segments are then encapsulated with an IP header at the network layer. The IP header contains the source and destination IP addresses.
Step 4: An MAC header is added to the IP datagram at the data link layer, containing the source and destination MAC addresses.
Step 5: The encapsulated frames are sent to the physical layer and sent over the network as bitstreams.
Steps 6-10: When Device B receives the bits from the network, it initiates the de-encapsulation process, which is the reverse of the encapsulation process. Headers are removed layer by layer, until Device B can access the original data.
Note that each layer uses the headers for processing instructions and does not need to unpack the data from the previous layer.
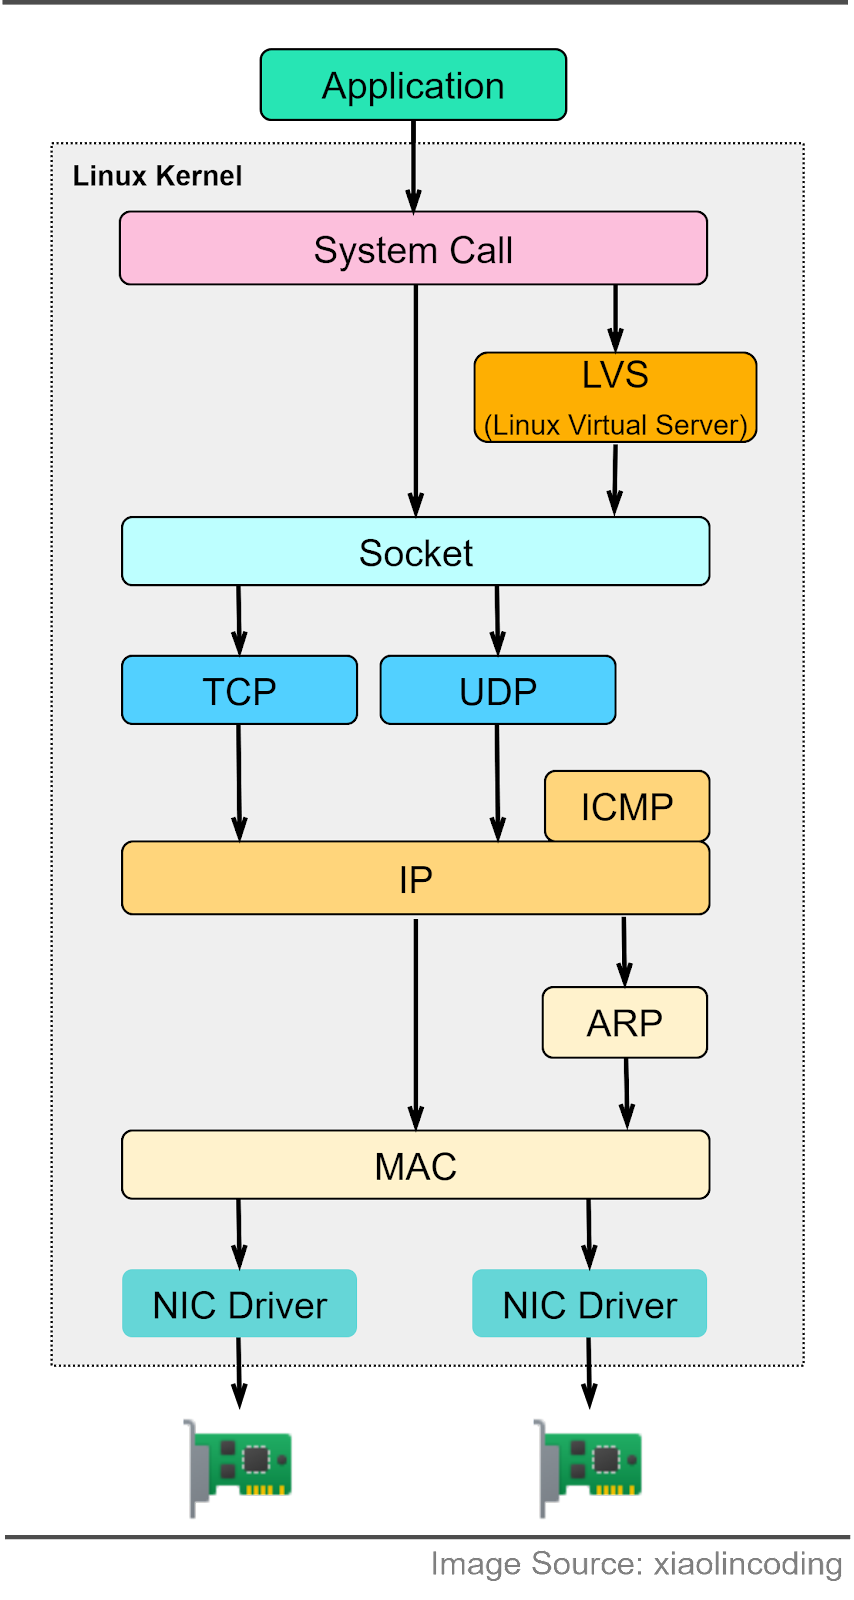
How do the OSI model layers map to a Linux server implementation? The diagram below provides more detail. The Linux network protocol stack aligns closely with the 4-layer TCP/IP model. The application sends data to the socket via system calls. The socket serves an abstraction for the communication endpoint. The socket layer accepts the data and passes it to the transport and network layer. The data eventually reaches the Network Interface Card (NIC) and is sent over the network.
In the next section, we will explore the common network protocols used when visiting an eCommerce website.
The Internet is complex. We will focus on the protocols that are important for system designs. Here, we will use an eCommerce website as an example.
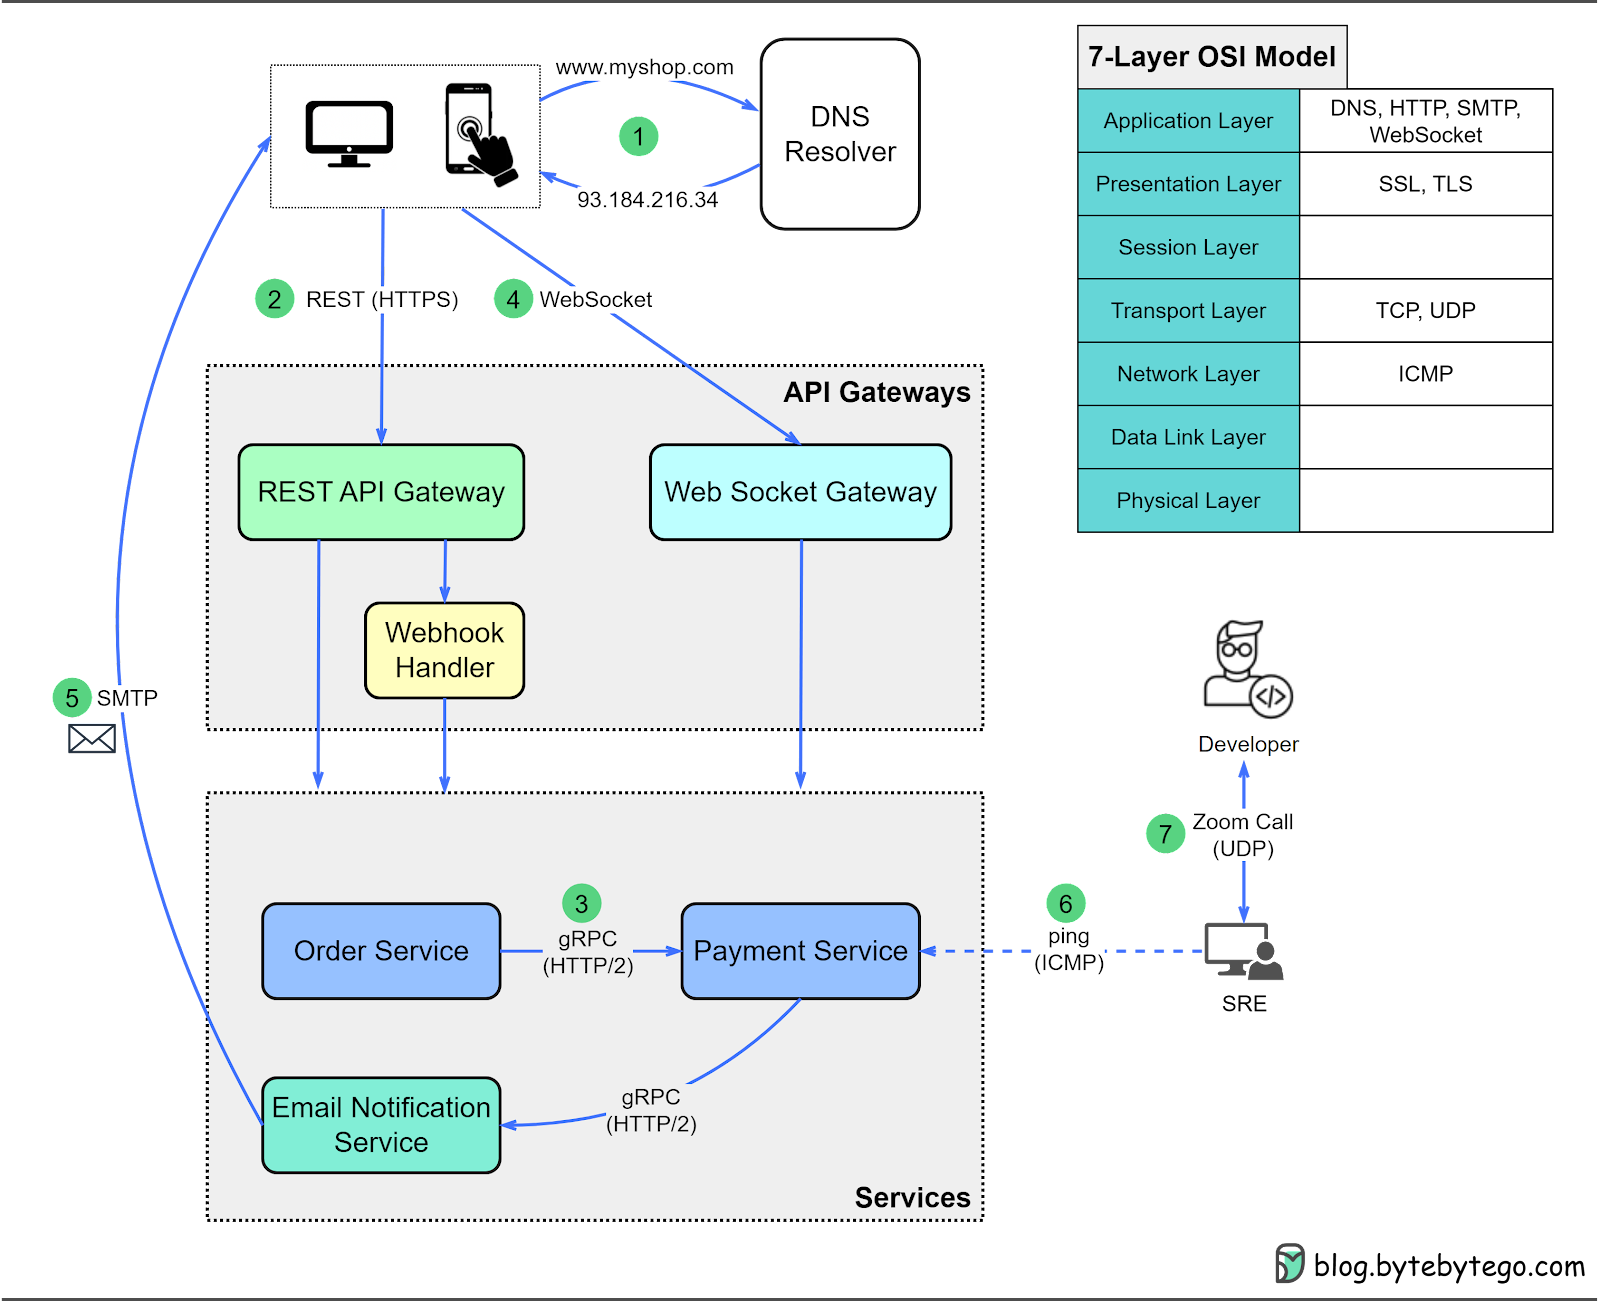
Step 1: DNS (Domain Name Service)
When we type a URL (Uniform Resource Locator) in a web browser, a DNS resolver translates the host name of the URL to an IP address. This helps us locate the web resources. The DNS resolver communicates with a hierarchy of name servers to retrieve this mapping. More details will follow.
Step 2: HTTP/HTTPS
The user interacts with the website via a REST API, which leverages HTTP to manage request methods. When a user decides to purchase an iPhone, an order is created on the website.
Step 3: gRPC (HTTP/2)
The order service talks to the payment service to create a payment transaction. In a microservice architecture, this is usually done via gRPC, which is based on HTTP/2.
Step 4: WebSocket
The client-side applications establish a WebSocket with the backend. This results in a full-duplex communication channel over a single TCP connection. This way, client-side applications can receive push notifications. For example, the success of a payment transaction can be pushed to the user’s device.
Step 5: SMTP
The email notification service sends an official email to the user’s email address using SMTP (Simple Mail Transfer Protocol).
Step 6: Ping (ICMP)
The SRE (Site Reliability Engineering) engineer notices a slowdown in one of the payment service instances and uses the ping command to check the availability of the server.
Step 7: Video call (UDP)
The SRE engineer needs assistance from an on-call developer. They hold a video call via Zoom, which uses UDP instead of TCP.
With this overall picture, we will dive into the protocols in the following sections.
When we type the URL www.myshop.com into the browser, what happens behind the scenes to display the web pages? Generally, there are three steps:
Resolve the domain name
Retrieve static cached web contents from a CDN (Content Delivery Network)
Retrieve dynamic data from the backend server
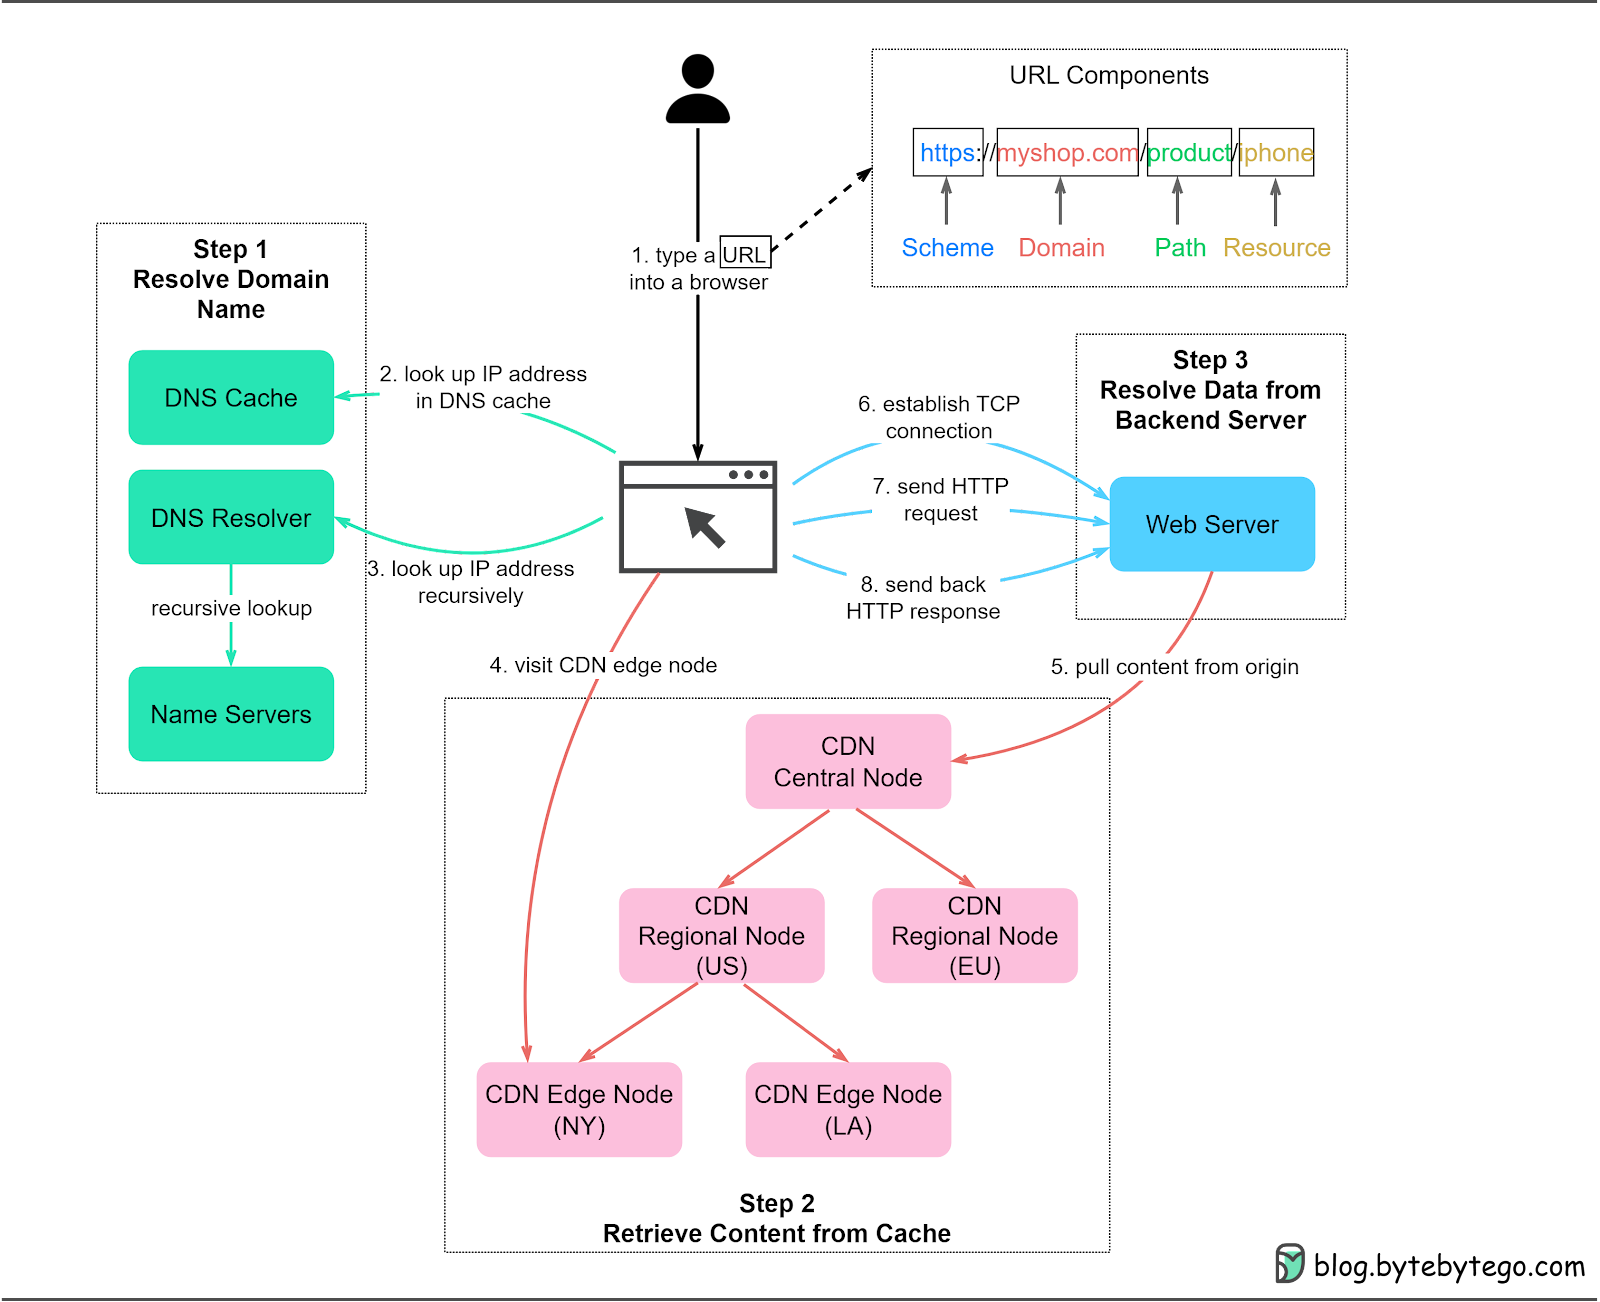
The diagram below shows the overall process.
Step 1: A user enters the URL https://myshop.com/product/iphone into a browser. A typical URL has four parts:
Scheme - https://. The protocol that is used to connect to the server.
Domain - myshop.com. The domain name of the website.
Path - product. The path to the server resource.
Resource - iphone. The name of the server resource requested.
Step 2: The browser first looks up the IP address of the domain in the DNS cache. DNS is an application-layer protocol that maintains the Internet’s address book. DNS cache can exist at different layers, including the browser cache, operating system cache, local network cache, and ISP cache.
Step 3: If the IP address is not cached, the browser asks the DNS resolver to recursively resolve the domain name via a hierarchy of name servers. More on this later.
Step 4: Now we have resolved the IP address. Note that if a CDN is used for the website, we receive an IP address for the CDN like www.myshop.cdn.com. The browser can then retrieve cached content from nearby CDN edge nodes. This significantly speeds up the page load time.
Step 5: CDN nodes are arranged hierarchically. If certain content isn’t available on an edge node, the CDN fetches the latest data from the web servers and propagates it to regional nodes and edge nodes.
Step 6: If dynamic resources are requested, the browser visits the web servers and establishes a TCP connection with the backend servers.
Step 7: The browser can then send HTTP requests to the server.
Step 8: The web servers send back the HTTP responses with the requested resources. The web browser renders the content and presents it to the user.
DNS servers are organized hierarchically with three main levels:
Root name servers (.). These servers store the IP addresses of Top Level Domain (TLD) name servers. There are 13 logical root name servers globally.
TLD name servers. These servers store the IP addresses of authoritative name servers. There are several types of TLD names. For example, generic TLD (.com, .org), country code TLD (.us), and test TLD (.test).
Authoritative name servers. These servers provide actual answers to DNS queries. You can register authoritative name servers with domain name registrars such as GoDaddy, Namecheap, etc.
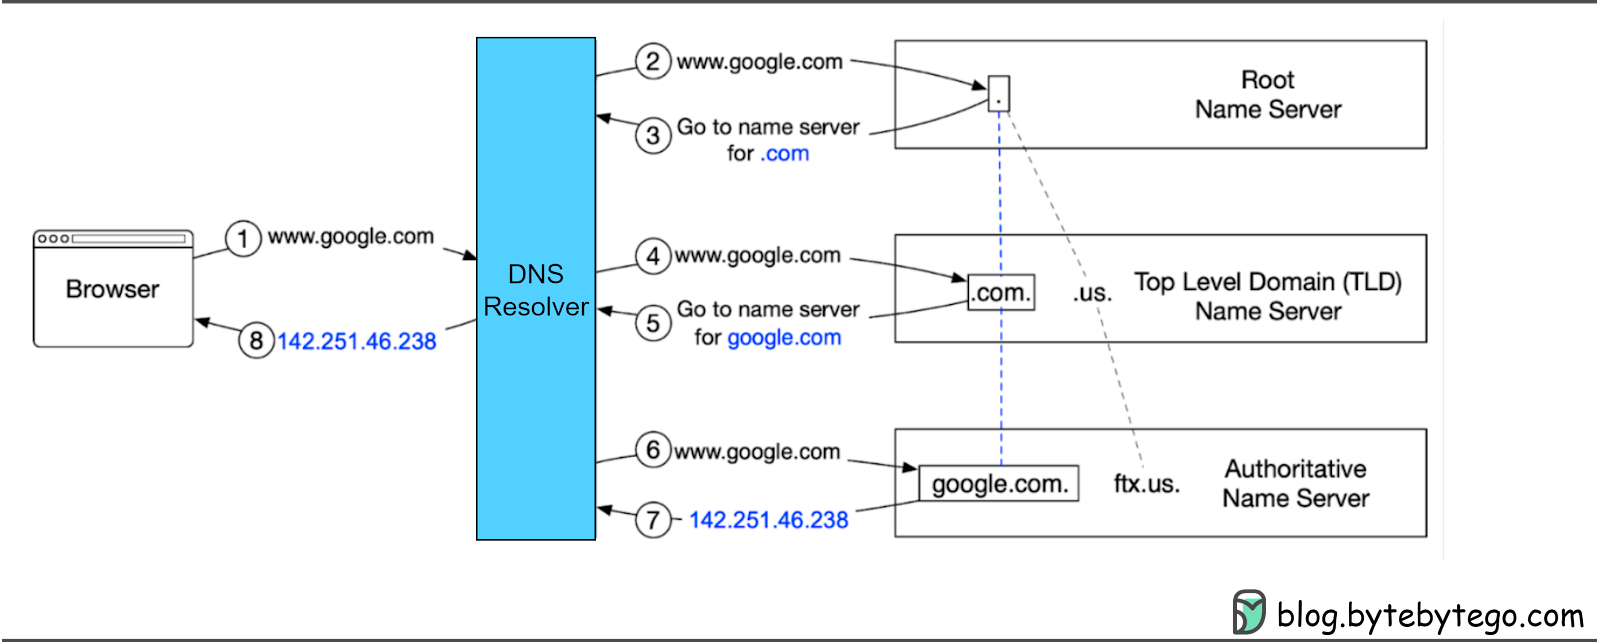
The diagram below shows how recursive DNS lookup works.
Step 1: The user types google.com into the browser, and the browser sends the domain name to the DNS resolver.
Step 2: The resolver queries a DNS root name server.
Step 3: The root server responds with the address of a .com TLD DNS server in this case.
Step 4: The resolver then sends a request to the .com TLD.
Step 5: The TLD server responds with the IP address of the domain’s name server, google.com (authoritative name server).
Step 6: The DNS resolver sends a query to the domain’s nameserver.
Step 7: The IP address for google.com is then returned to the resolver from the nameserver.
Step 8: The DNS resolver responds to the web browser with the IP address (142.251.46.238) of the initially requested domain.
DNS lookups take on average 20-120 milliseconds to complete according to YSlow.
A content delivery network (CDN) consists of geographically distributed servers (also known as edge servers) that provide fast delivery of static and dynamic content.
With a CDN, users don’t need to retrieve content (music, video, files, pictures, etc.) from the origin server. Instead, the content is cached at CDN nodes around the globe, and users can retrieve the content from nearby CDN nodes. Companies in this sector include Cloudflare, Fastly, and Akamai.
Benefits of a CDN include:
1. Improved latency
2. Reduced bandwidth
3. Enhanced website security, particularly protection against DDoS (Distributed Denial-of-Service) attacks
4. Increased content availability
In the last section, we saw how a recursive DNS lookup worked. The lookup process becomes more complicated when a CDN is involved because we need to get the IP address of a nearby CDN server instead of the web server.
Let’s take a look at how it works with the diagram below.
Suppose Bob, who lives in New York, wants to visit an eCommerce website that is deployed in London. If the request goes to servers located in London, the response will be quite slow. To overcome this, we deploy CDN servers close to Bob, and the content will be loaded from a nearby CDN server.
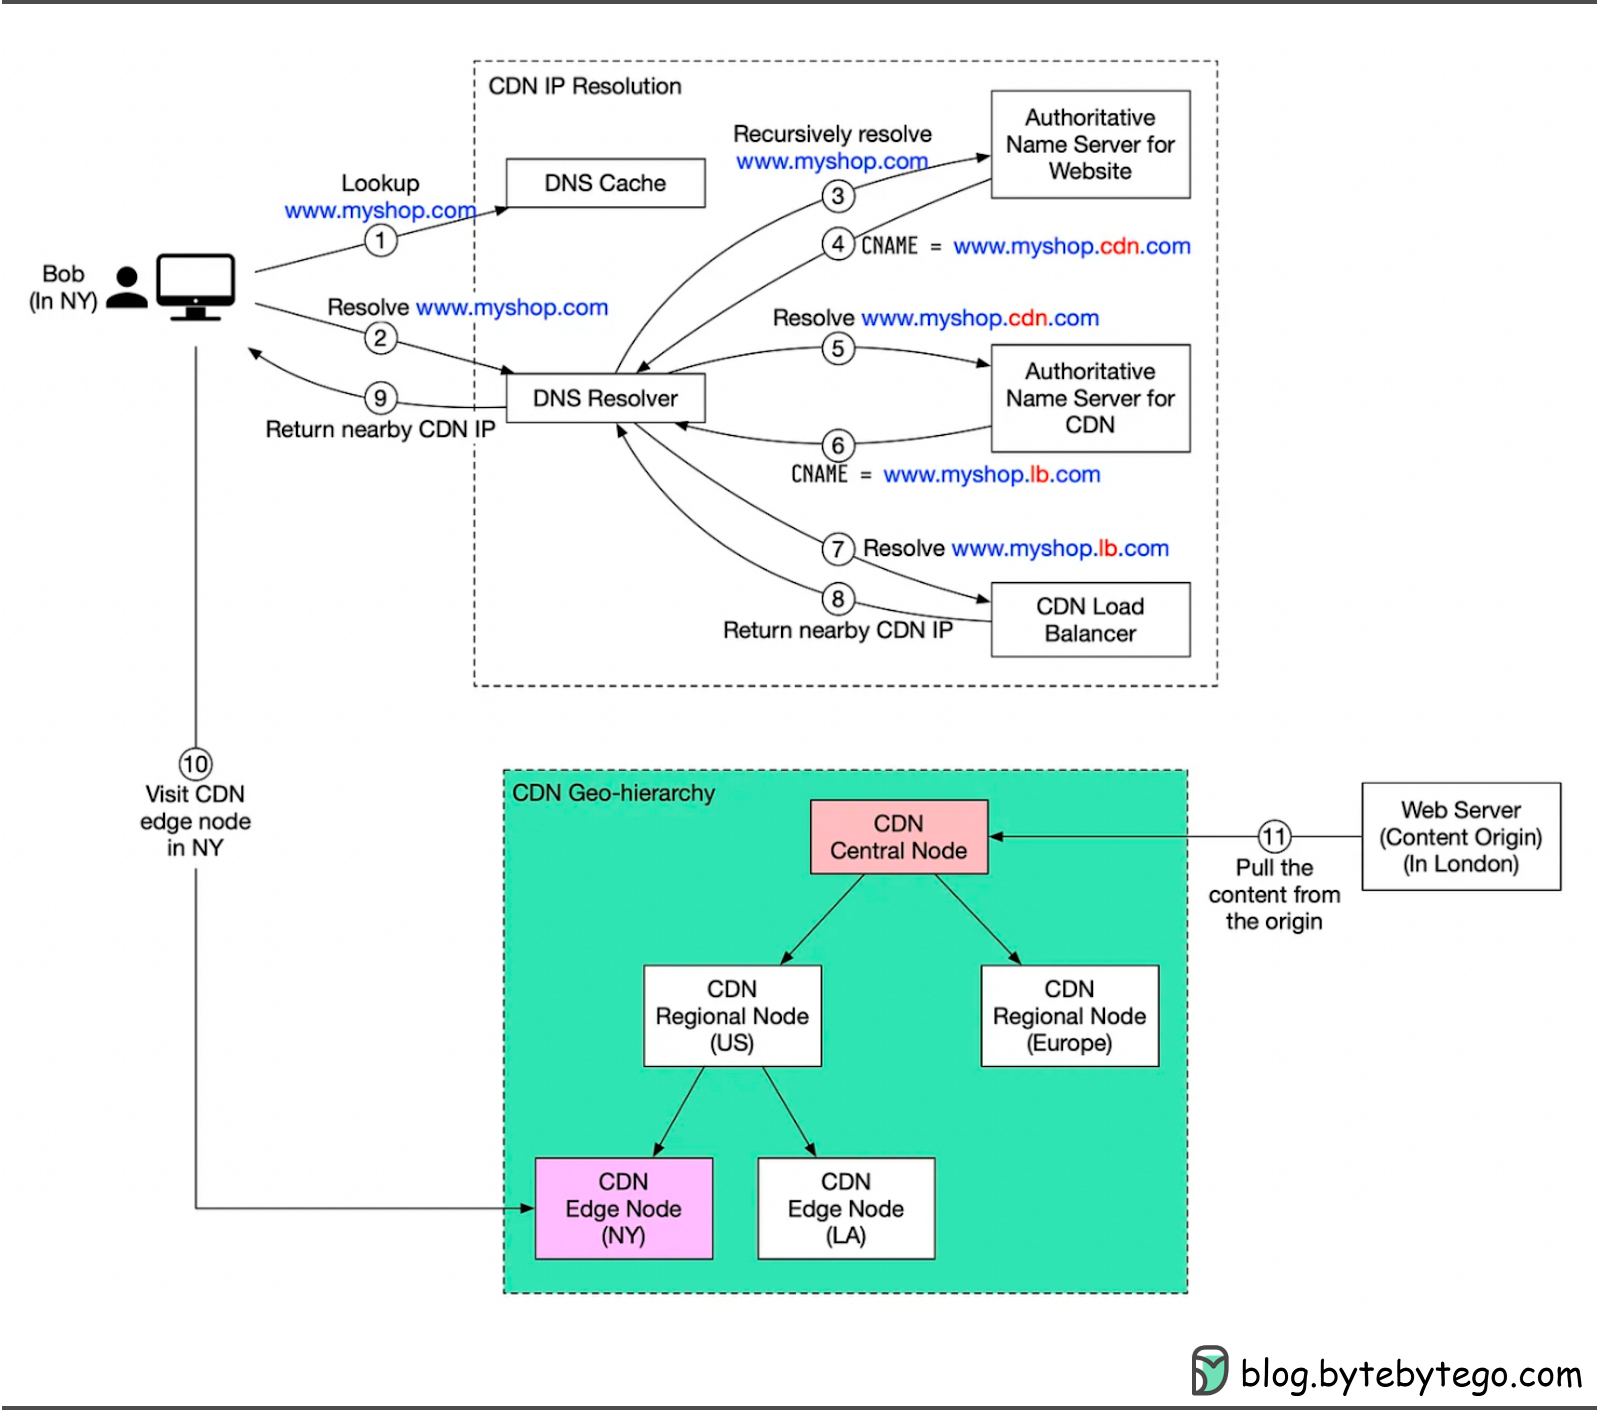
The diagram below illustrates the process:
Step 1: Bob types in www.myshop.com in the browser. The browser looks up the domain name in the local DNS cache.
Step 2: If the domain name does not exist in the local DNS cache, the browser goes to the DNS resolver to resolve the name.
Step 3: The DNS resolver recursively resolves the domain name. Finally, it asks the authoritative name server to resolve the domain name.
Step 4: If we don’t use a CDN, the authoritative name server returns the IP address for www.myshop.com. But with a CDN, the authoritative name server has an alias pointing to www.myshop.cdn.com (the domain name of the CDN server).
Step 5: The DNS resolver asks the authoritative name server to resolve www.myshop.cdn.com.
Step 6: The authoritative name server returns the domain name for the CDN load balancer www.myshop.lb.com.
Step 7: The DNS resolver asks the CDN load balancer to resolve www.myshop.lb.com. The load balancer chooses an optimal CDN edge server based on the user’s IP address, the user’s ISP, the content requested, and the server load.
Step 8: The CDN load balancer returns the CDN edge server’s IP address for www.myshop.lb.com.
Step 9: Now we finally get the actual IP address to visit. The DNS resolver returns the IP address to the browser.
Step 10: The browser visits the CDN edge server to load the content. There are two types of content cached on the CDN servers: static content and dynamic content. The former contains static pages, pictures, and videos; the latter includes results of edge computing.
Step 11: If the edge CDN server cache doesn't contain the content, it goes upward to the regional CDN server. If the content is still not found, it will go upward to the central CDN server, or even go to the origin - the London web server. This is called the CDN distribution network, where the servers are deployed geographically.
In this article, we discussed how network protocols standardize connections among heterogeneous Internet devices. When we send data over the network, it is encapsulated on the sender side and decapsulated on the receiver side. Each layer of the OSI model has its own responsibilities. There are many protocols defined in TCP/IP stack, and we should start from the most common ones that impact system designs. Then we talked about the first important protocol DNS and how DNS acts as an Internet address book.
We will continue with TCP in the next issue, the foundation for client-server and server-server communication.