We have covered three types of authentication so far: HTTP basic authentication, session-cookie authentication, and token-based authentication. They all require a password. However, there are other ways to prove your identity without a password.
When it comes to authentication, there are three factors to consider:
Knowledge factors: something you know, such as a password
Ownership factors: something you own, such as a device or phone number
Inherence factors: something unique to you, such as your biometric features
Passwords fall under “something you know”. One-Time Passwords (OTP) prove that the user owns a cell phone or a device, while biometric authentication proves "something unique to you".
One-Time Passwords (OTP) are widely used as a more secure method of authentication. Unlike static passwords, which can be reused, OTPs are valid for a limited time, typically a few minutes. This means that even if someone intercepts an OTP, they can’t use it to log in later. Additionally, OTPs require “something you own” as well as “something you know” to log in. This can be a cell phone number or email address that the user has access to, making it harder for hackers to steal.
However, it's important to note that using SMS as the delivery method for OTPs can be less secure than other methods. This is because SMS messages can be intercepted or redirected by hackers, particularly if the user's phone number has been compromised. In some cases, attackers have been able to hijack phone numbers by convincing the mobile carrier to transfer the number to a new SIM card. Once the attacker has control of the number, they can intercept any OTPs sent via SMS. For this reason, it's recommended to use alternative delivery methods, such as email or mobile apps, whenever possible.
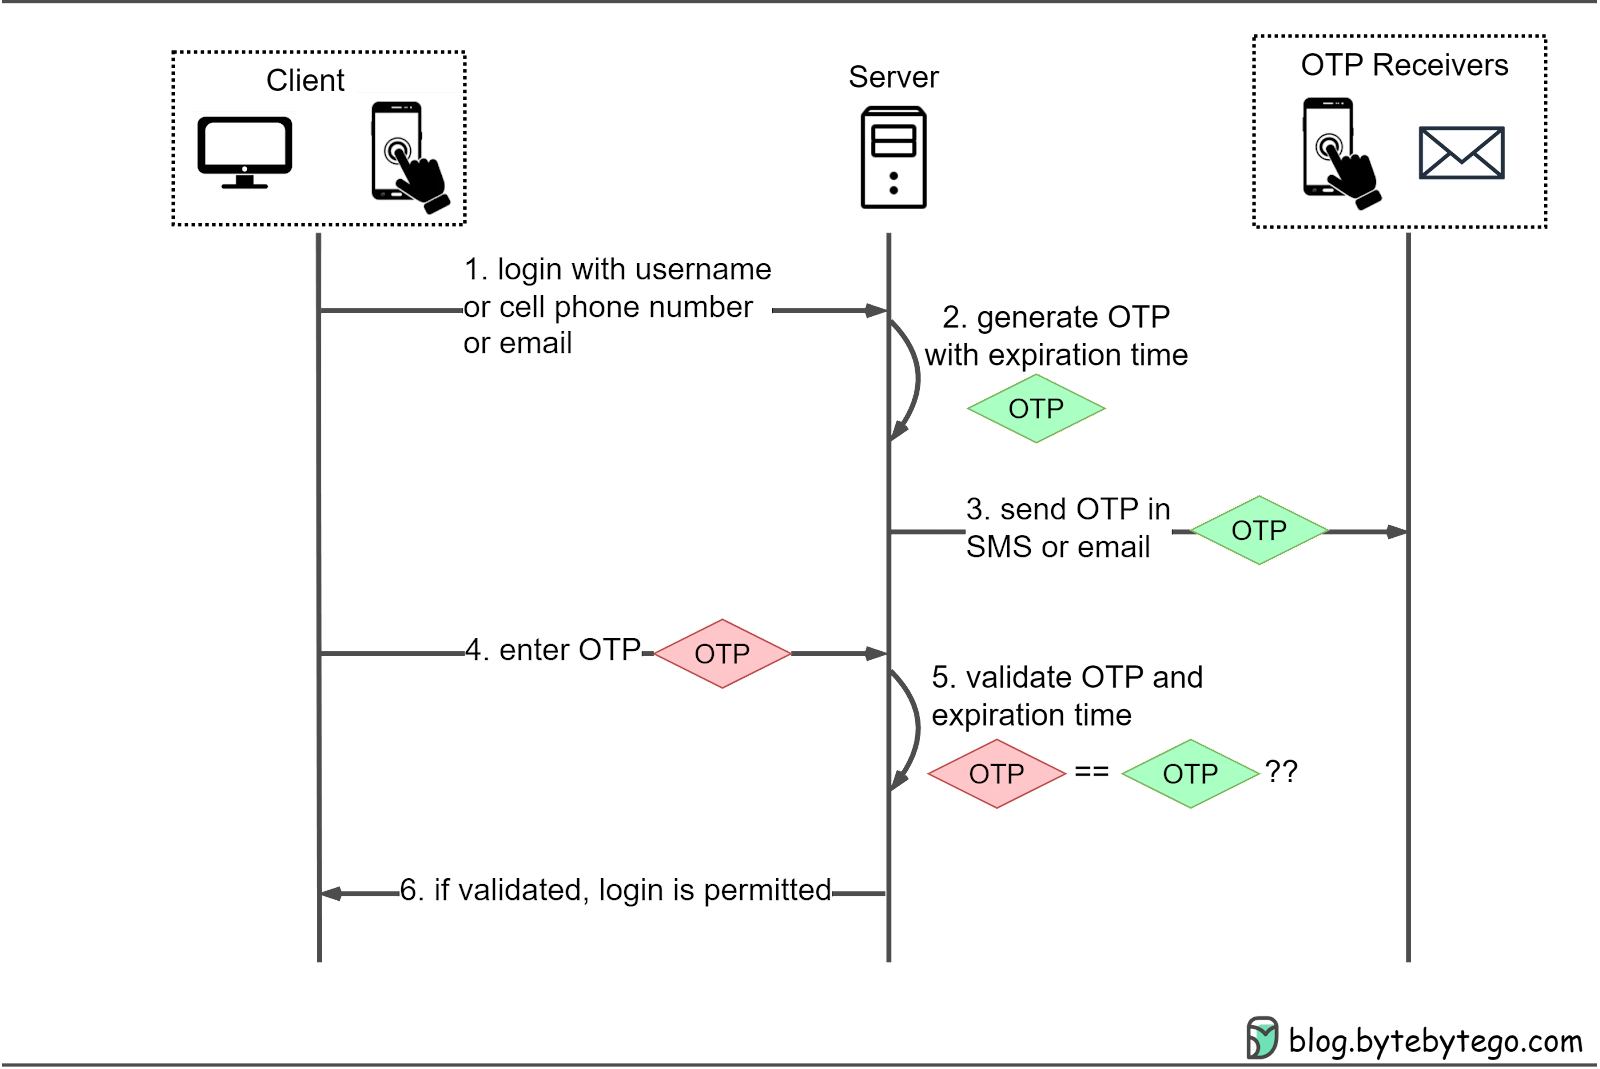
Here’s how OTPs work in more detail:
Step 1: The user wants to log in to a website and is asked to enter a username, cell phone number, or email.
Step 2: The server generates an OTP with an expiration time.
Step 3: The server sends the OTP to the user’s device via SMS or email.
Step 4: The user enters the OTP received in the login box.
Step 5-6: The server compares the generated OTP with the one the user entered. If they match, login is granted.
Alternatively, a hardware or software key can be used to generate OTPs for multi-factor authentication (MFA). For example, Google 2FA uses a software key that generates a new OTP every 30 seconds. When logging in, users enter their password and the current OTP displayed on their device. This adds an extra layer of security as hackers would need access to the user’s device to steal the OTP. More on MFA later.
Single Sign-On (SSO) is a user authentication method that allows us to access multiple systems or applications with a single set of credentials. SSO streamlines the login process, providing a seamless user experience across various platforms.
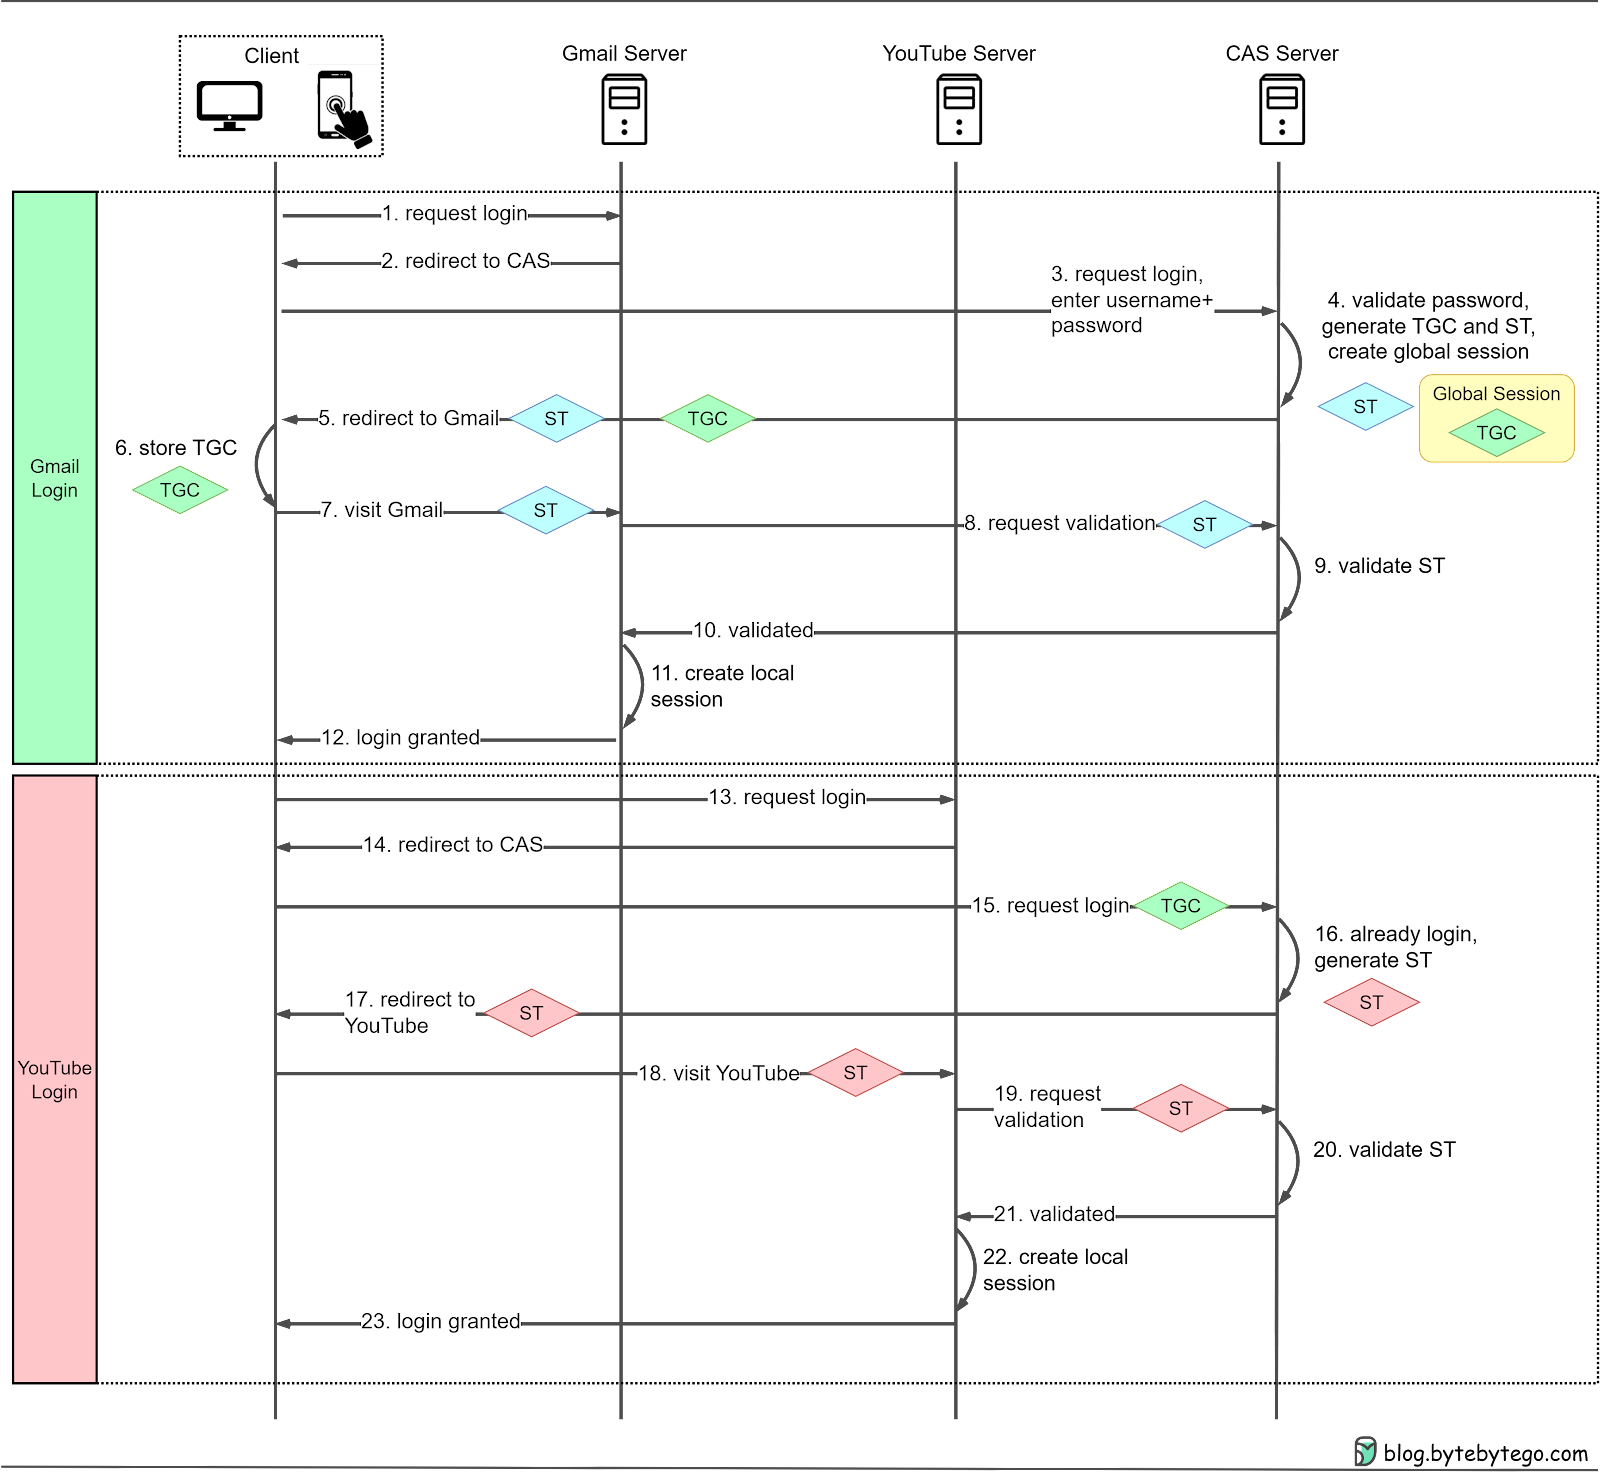
The SSO process mainly relies on a Central Authentication Service (CAS) server. Here's a step-by-step breakdown of the SSO process:
When we attempt to log in to an application, such as Gmail, we're redirected to the CAS server.
The CAS server verifies our login credentials and creates a Ticket Granting Ticket (TGT). This TGT is then stored in a Ticket Granting Cookie (TGC) on our browser, representing our global session.
CAS generates a Service Ticket (ST) for our visit to Gmail and redirects us back to Gmail with the ST.
Gmail uses the ST to validate our login with the CAS server. After validation, we can access Gmail.
When we want to access another application, like YouTube, the process is simplified:
Since we already have a TGC from our Gmail login, CAS recognizes our authenticated status.
CAS generates a new ST for YouTube access, and we can use YouTube without inputting our credentials again.
This process reduces the need to remember and enter multiple sets of credentials for different applications.
There are different protocols that facilitate SSO:
SAML (Security Assertion Markup Language) is widely used in enterprise applications. SAML communicates authentication and authorization data in an XML format.
OIDC (OpenID Connect) is popular in consumer applications. OIDC handles authentication through JSON Web Tokens (JWT) and builds on the OAuth 2.0 framework. More on this in the next section.
For new applications, OIDC is the preferred choice. It supports various client types, including web-based, mobile, and JavaScript clients.
SSO offers a streamlined and secure authentication method, providing a seamless user experience by requiring only one set of credentials for multiple applications. This approach enhances security through the use of strong, unique passwords and reduced phishing risks. It also minimizes administrative burdens for IT departments.
While OAuth 2.0 is primarily an authorization framework, it can be used in conjunction with OpenID Connect (OIDC) for authentication purposes. OIDC is an authentication layer built on top of OAuth 2.0, enabling the verification of a user's identity and granting controlled access to protected resources.
When using "Sign in with Google" or similar features, OAuth 2.0 and OIDC work together to streamline the authentication process. OIDC provides user identity data in the form of a standardized JSON Web Token (JWT). This token contains information about the authenticated user, allowing the third-party application to create a user profile without requiring a separate registration process.
In this setup, OAuth 2.0 provides "secure delegated access" by issuing short-lived tokens instead of passwords, allowing third-party services to access protected resources with the resource owner's permission. This method enhances security, as the third-party service does not handle or store the user's password directly.
The diagram below shows how the protocol works in the “Sign in with Google” scenario.
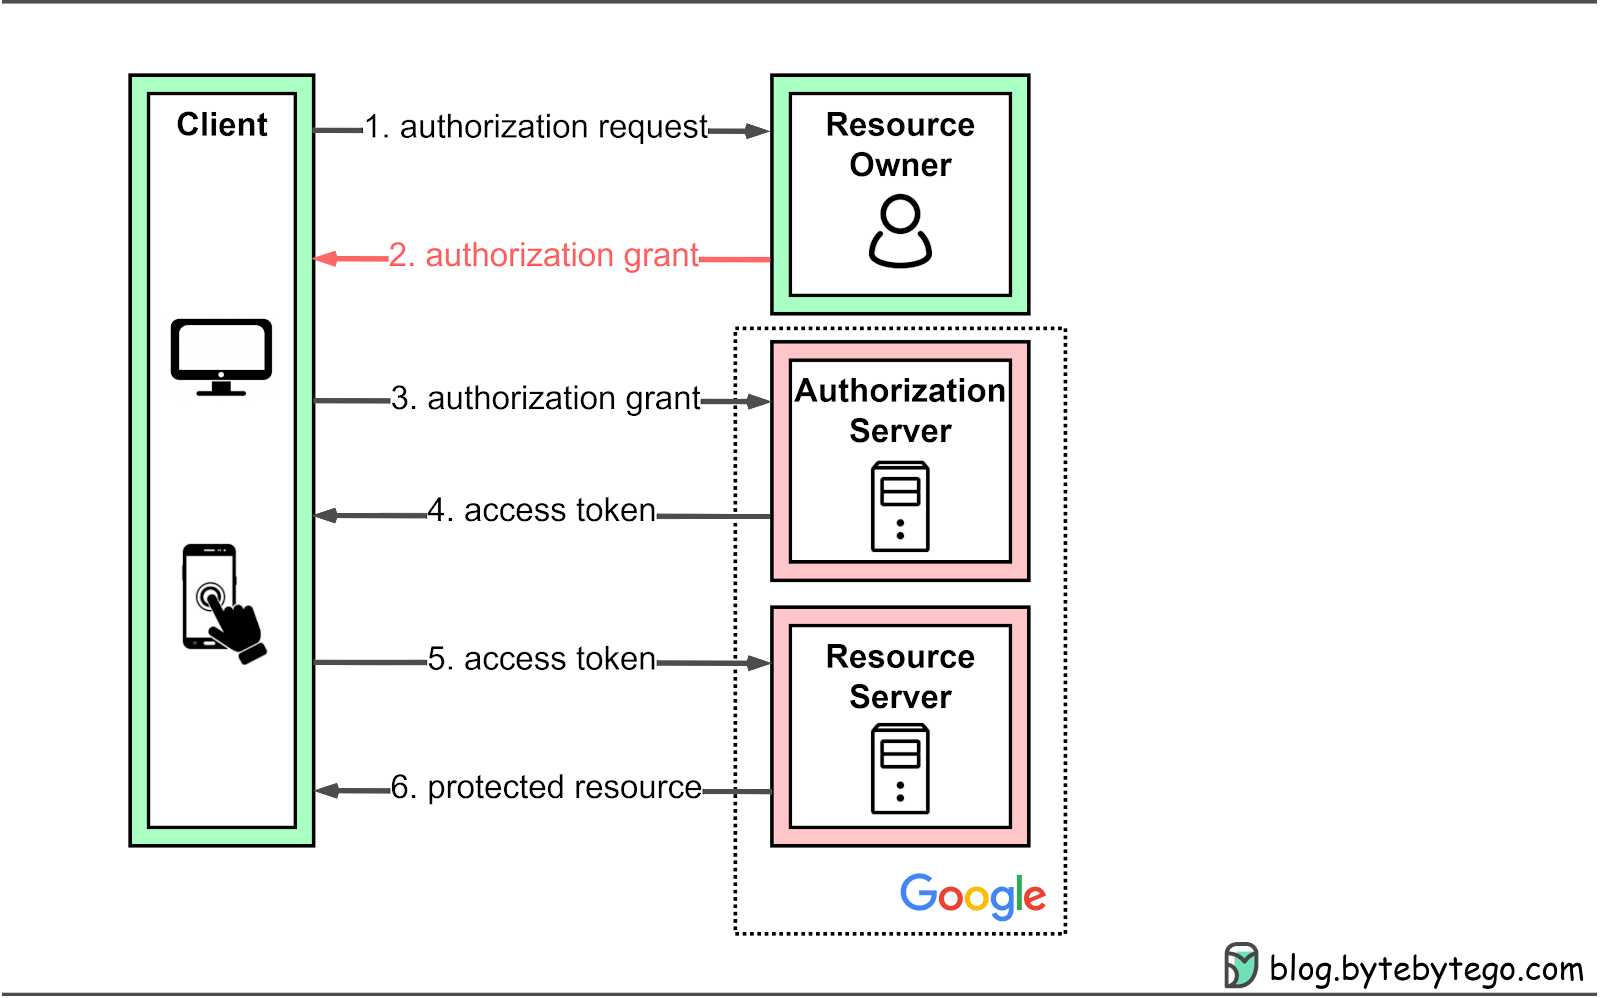
In the “Sign in with Google” example, OAuth 2.0 defines four roles:
Resource owner: The end user, who controls access to their personal data.
Resource server: The Google server hosting user profiles as protected resources. It uses access tokens to respond to protected resource requests, ensuring that only authorized services can access the data.
Client: The device (PC or smartphone) making requests on behalf of the resource owner. This device represents the third-party application seeking access to the user's data.
Authorization server: The Google authorization server that issues tokens to clients, managing the secure exchange of tokens between the resource server and the client.
OAuth 2.0 offers four types of authorization grants to accommodate different situations:
Authorization code grant: The most complete and versatile mode, suitable for most application types. More details below.
Implicit grant: Designed for applications with only a frontend, such as single-page applications or mobile apps. This is no longer recommended. More details below.
Resource owner password credentials grant: Used when users trust a third-party application with their credentials, such as a trusted mobile app.
Client credentials grant: Suitable for cases without a frontend, like command-line tools or server-to-server communication, where resource owner interaction is not needed.
The standard provides multiple modes to cater to different application scenarios and requirements, ensuring flexibility and adaptability for diverse situations.
The authorization code grant is one example worth examining. The specifications for the other three grant types are available in RFC-6749.
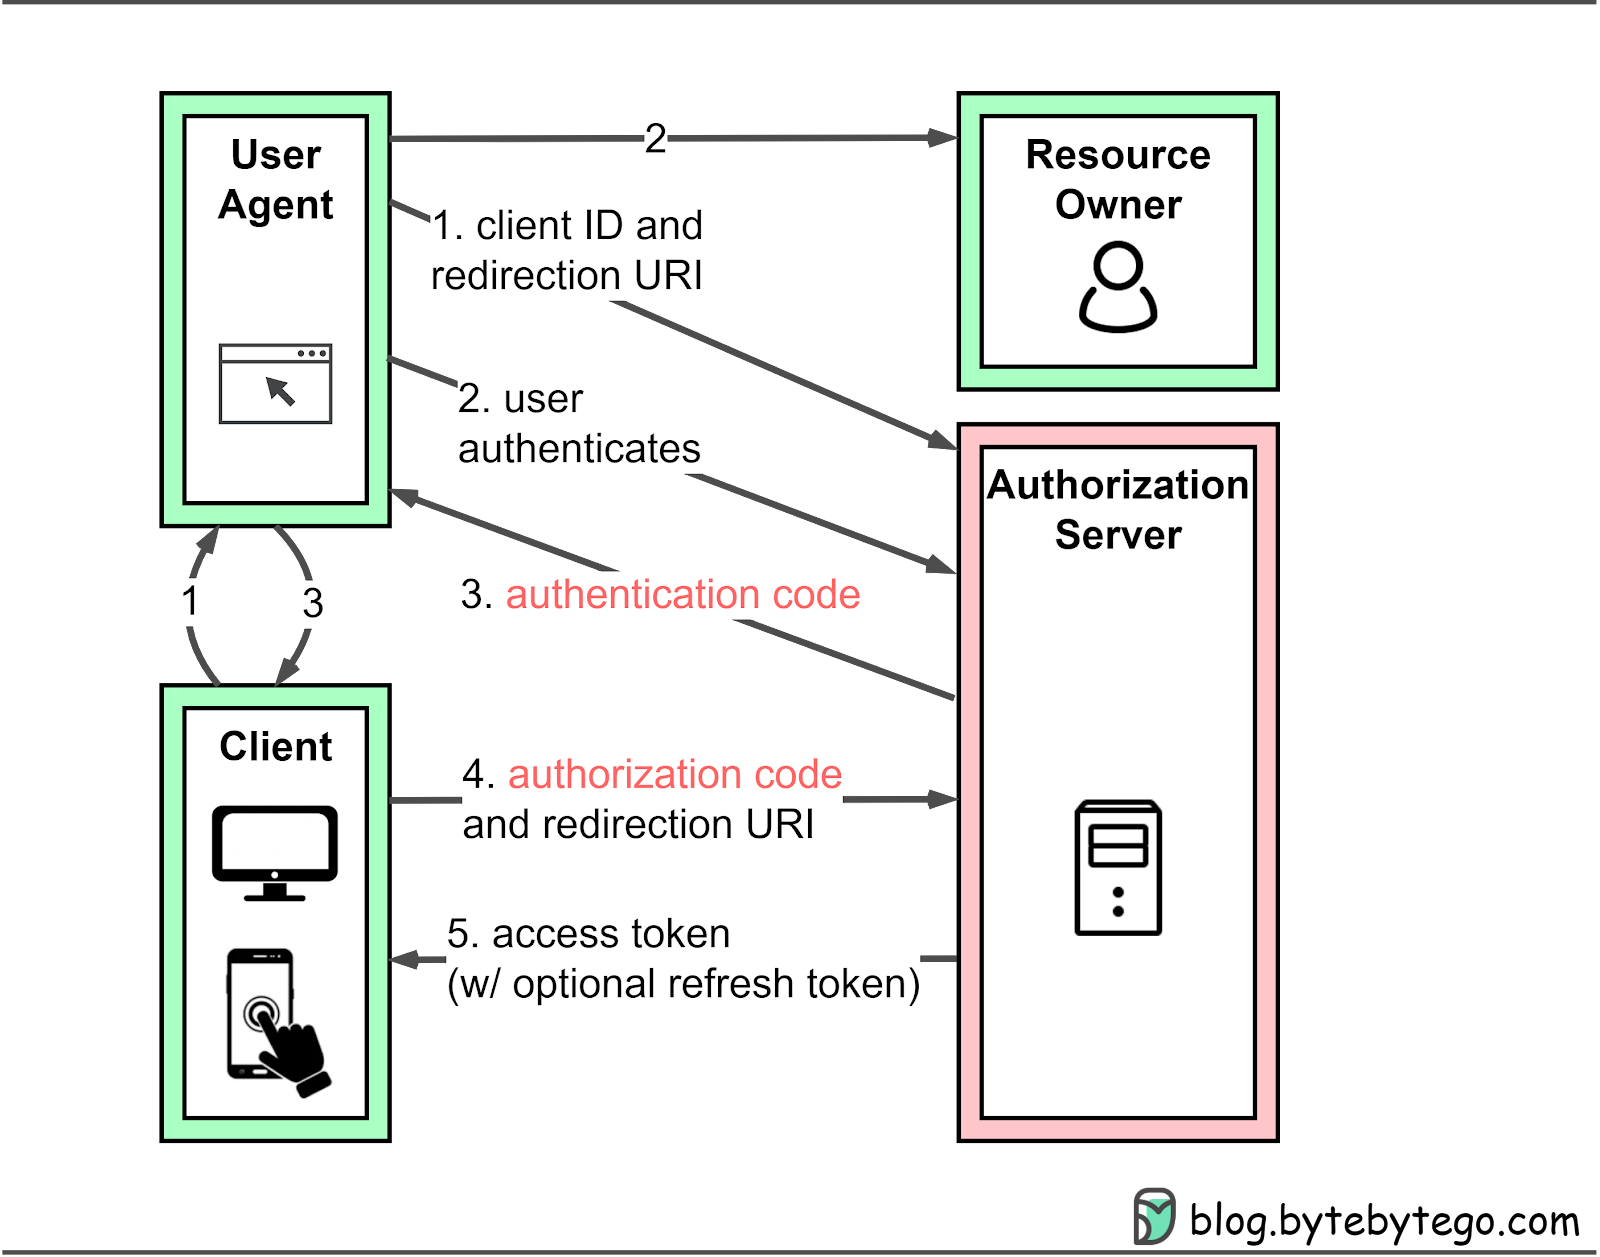
Unlike other grant types, the authorization code grant issues an authentication code first, which the client then uses to obtain an access token. The process involves the following steps:
Step 1: The client directs the resource owner’s user agent (typically a web browser) to the authorization server, presenting the requested permissions (scopes).
Step 2: The resource owner either grants or denies the client's access request, based on their assessment of the third-party application's trustworthiness.
Step 3: If the resource owner grants access, the authorization server redirects the user agent back to the client using a redirection URI containing an authentication code.
Step 4: The client uses the authentication code to request an access token from the authorization server. The code and redirection URI must match those issued in step 3 to ensure that the request is legitimate.
Step 5: After successful validation, the authorization server provides an access token, enabling the client to access the user's protected resources within the defined scope.
As previously noted, the implicit grant is no longer recommended, mainly because of its inherent security concerns, particularly the exposure of access tokens. The Authorization Code Grant, combined with the added security of Proof Key for Code Exchange (PKCE), has become the preferred approach for securing frontend applications.
It is worth noting that while OAuth 2.0 with OIDC still requires password entry, it is considered "passwordless" in the sense that users don't need to register a new account or create passwords for third-party websites.
Biometric authentication uses unique physical characteristics of a person, such as facial features, fingerprints, or retinal patterns, to verify their identity. During registration, users are asked to take several pictures that capture these features, which are then extracted and stored securely in a backend system.
When the user logs in, the backend system compares the live biometric features with the stored ones. If they match, the user is granted access. While this method of authentication adds another layer of security compared to passwords, it’s not foolproof. Biometric features can be stolen or replicated. In addition, some people may not have distinct or consistent biometric features, making it difficult for them to use this method of authentication.
Biometric authentication should not be used as the sole authentication factor. Instead, it should be combined with other factors such as passwords or PINs, known as multi-factor authentication. This provides an extra layer of security and reduces the risk of unauthorized access. In the event that biometric data is stolen, the additional authentication factor will still protect the user's account. We cover MFA next.
The FIDO (Fast IDentity Online) Alliance takes biometric authentication further by leveraging the biometrics stored on the users’ devices for website registration and authentication. More details on this are covered in the FIDO section.
Multi-Factor Authentication (MFA) is a security measure that requires users to provide more than one form of identification to access protected resources. This is important because single-factor authentication we covered so far can be less secure.
MFA typically involves using two out of three authentication factors: something you know (like a password or PIN), something you own (like a phone or token), and something you are (like a fingerprint or face recognition). By requiring multiple factors, MFA provides an extra layer of security and makes it harder for unauthorized users to access protected resources.
For example, Google 2FA uses something you own (your phone) as one factor, and something you know (your username and password) as another factor. When you enable Google 2FA, you'll use an app like Google Authenticator to generate a unique code on your phone every 30 seconds. To access protected resources, you'll need to enter this code along with your username and password.
Two-Factor Authentication (2FA) using time-based codes, such as Google 2FA, relies on TOTP (Time-based One-Time Passwords). The algorithms use a seed and a changing factor to generate the result. In TOTP, the changing factor is a timestamp, while in HOTP (HMAC-based OTP), it is a counter. 2FA is developed using standards from OATH (Initiative for Open Authentication).
Here's a detailed explanation of how it works:
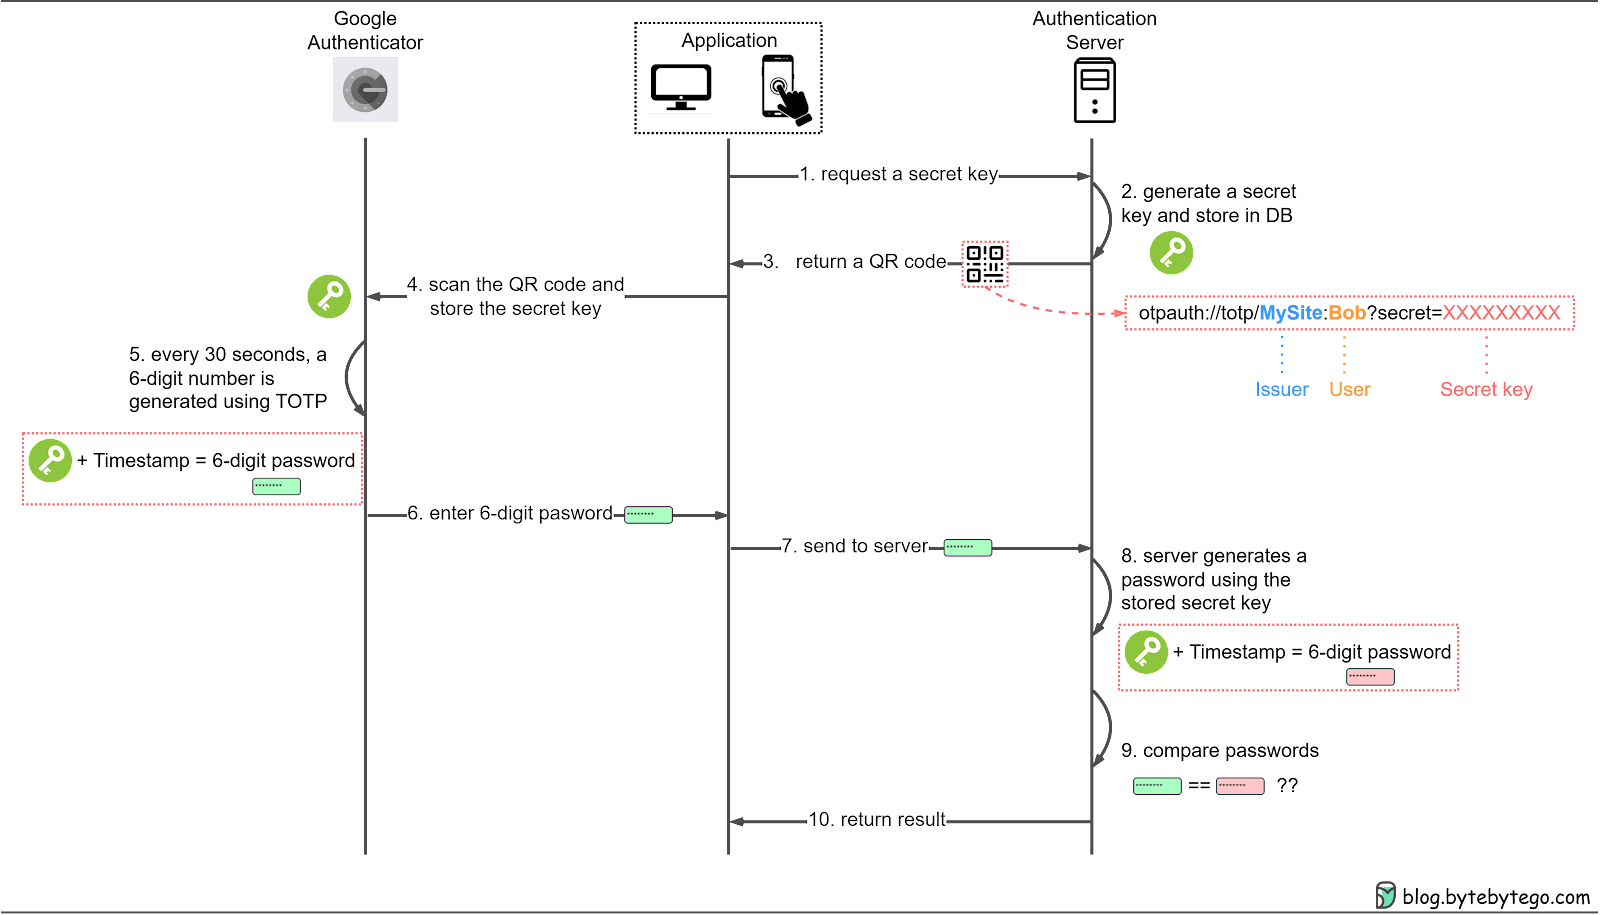
Steps 1-4: Setting up 2FA in an app
First, the user needs to enable 2FA first in an application. The server generates a secret key and creates a QR code containing the issuer, user, and secret key. The user then scans the QR code with a 2FA app like Google Authenticator, which stores the secret key locally on their device.
Steps 5-10: Using 2FA to access protected resources
After setting up 2FA, the user can use it to request access to protected resources. Every 30 seconds, the 2FA app generates a 6-digit one-time password using the stored secret key and the current timestamp. The user enters this OTP into the application, which sends it to the server. The server generates its own OTP using the secret key it has on file and compares it to the OTP received. If they match, the validation is successful, and the user gains access.
We have covered various authentication methods, including those with or without passwords. Although OAuth 2.0 enables access delegation, we still need to register credentials on platforms like Google, which means passwords remain stored on servers. Password-related attacks and leaks are frequently reported in the news.
Is it possible to move away from server-stored passwords?
On May 5, 2022, Google, Apple, and Microsoft pledged to support passwordless sign-in across their mobile, desktop, and browser platforms in the coming years. These standards are developed by the FIDO Alliance and the World Wide Web Consortium (W3C). FIDO enables users to sign in using passkeys across their devices with biometric or security key authentication.
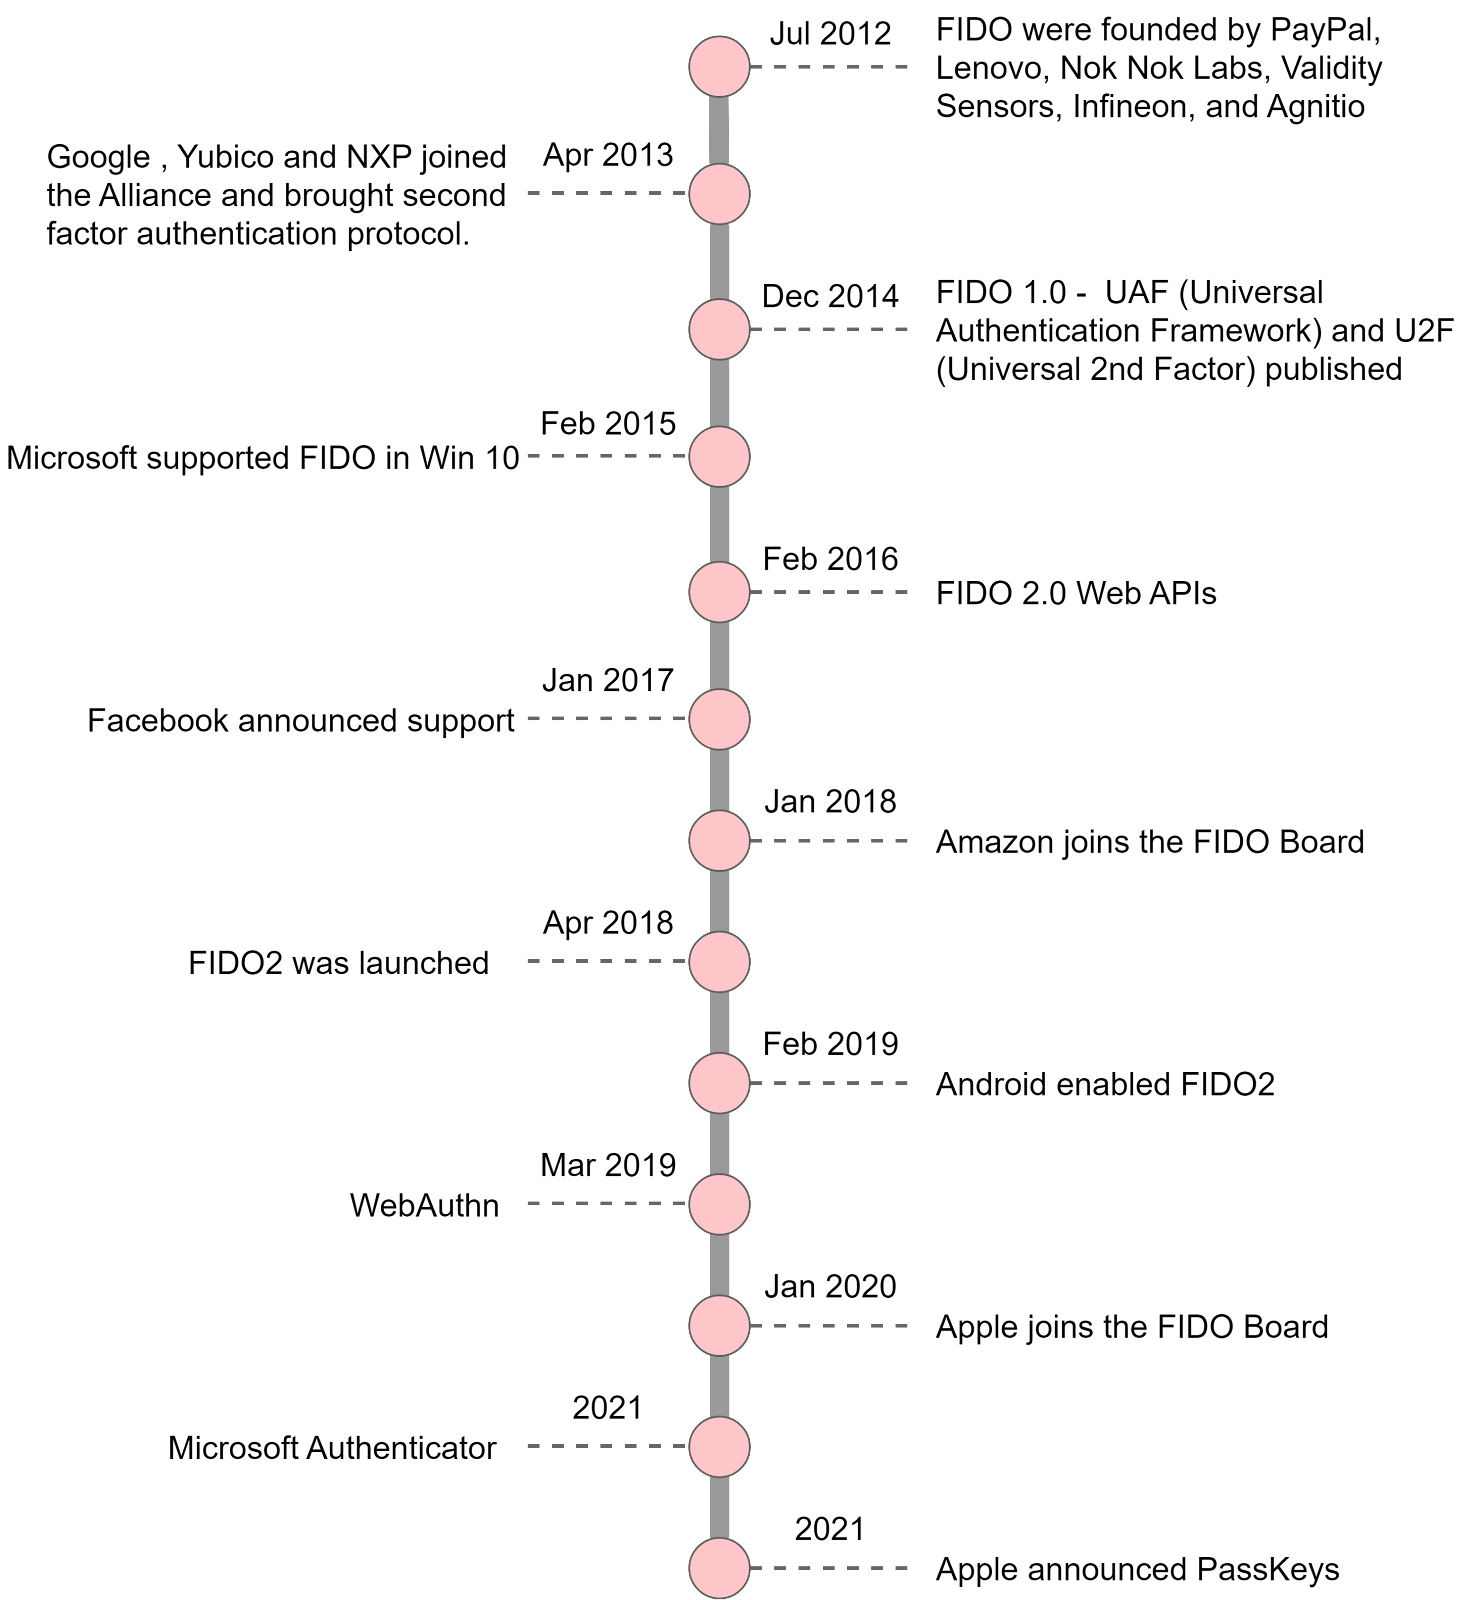
The diagram below shows a brief history of tech giants’ joint efforts in their pursuit of a passwordless future.
The FIDO2 framework includes WebAuthn, which defines a standard web API with built-in authenticators like on-device biometrics or PINs, and CTAP (Client-to-Authenticator Protocols), which enables the use of external authenticators (FIDO Security Keys, mobile devices, wearables, etc) for authentication.
The basic idea is that the credentials (private keys) are owned by the user and managed by an authenticator. The application server only stores the public key, the private keys never leave the users’ devices.
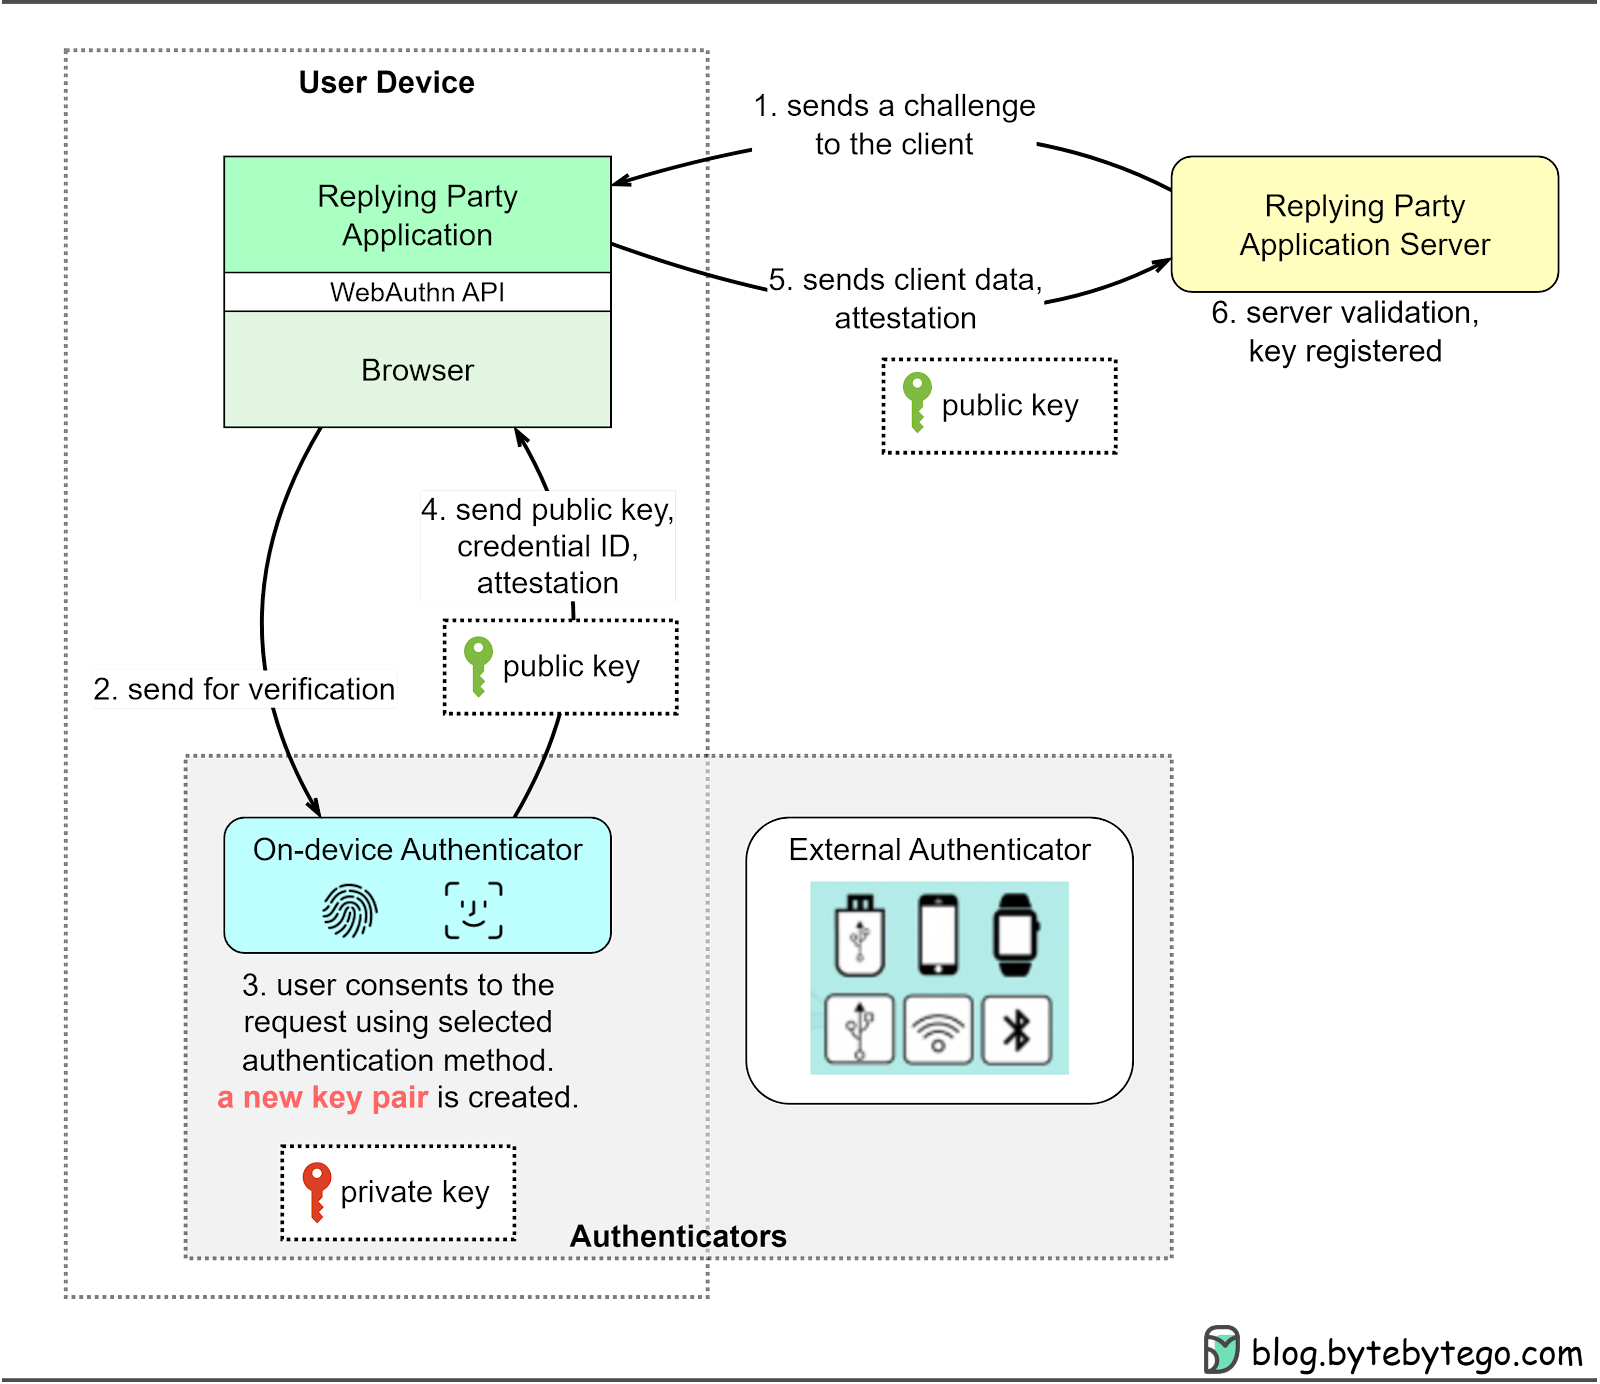
The diagram below shows how FIDO works in the registration process.
Step 1: When the user registers on an application, the replying party (RP)’s application server sends a challenge to the RP client application using WebAuthn.
Step 2: The client application forwards the challenge to an authenticator, using the selected authentication method.
Step 3-4: The user approves the request using the selected authentication method. A new pair of keys is created, with the private key stored with the authenticator and the public key sent back to the RP client along with the credential ID and attestation.
Step 5: The RP client sends the public key, client data, and attestation to the RP server.
Step 6: The RP server validates the response and registered the public key for the user.
WebAuthn is already being adopted by major platforms and service providers such as Google, Microsoft, and Dropbox. These companies have begun integrating WebAuthn into their services, offering users a more secure and convenient passwordless authentication experience. For instance, Microsoft's Windows Hello allows users to sign in to their devices and accounts using biometric data like facial recognition or fingerprint scans. Google also offers passwordless authentication for their services, allowing users to authenticate with security keys or their Android devices.
It's important to note that FIDO is not intended to replace existing federation authentication protocols (SSO, OAuth) but can work alongside them. For more information, refer to this document.
In this two-part series, we talk about different ways to keep online access safe. We look at password methods like HTTP Basic Access Authentication, Session-Cookie Authentication, and Token-Based Authentication, including Basic Token Authentication and JWT. We also discuss passwordless methods such as One-Time Passwords (OTP), Single Sign-On (SSO), OAuth 2.0 with OpenID Connect, and Biometric Authentication.
We also go over Multi-Factor Authentication (MFA) and Time-based OTP, which make security stronger. Then, we explore the future of authentication using FIDO, which includes WebAuthn and CTAP, showing a move towards safer and easier-to-use methods.
We finish the series with a diagram that shows how authentication has changed over time. As we keep trying to make things simpler and safer, we encourage developers to use advanced techniques like FIDO when building new websites or apps.
